This Stuffed Dill Pickle Appetizer Is All You Need At Your Next Party

By: Augusta Statz

Magic Valley 


If you’re looking for the perfect savory appetizer to serve guests at your next party, look no further. Not only is this appetizer option memorable, but it’s sure to be delicious — especially for a pickle-loving crowd.

(photo by: Little Dairy On The Prairie)


This recipe for Stuffed Dill Pickles from Mid-Life Croissant takes the average dip situation and raises it up a notch. You’re not going to make a dip that’s placed in a bowl and served with pickles and pretzels. Oh no. Instead, you’re going to put the dip inside of a pickle that’s been sliced in half and cored in the middle — an appetizer you’ve likely never seen before.
Perhaps the best part of all is that the recipe only calls for four ingredients: pickles, goat cheese, parsley and oregano.


This appetizer is salty, cheesy, has pickles and is packed full of flavor. What more could you ask for?

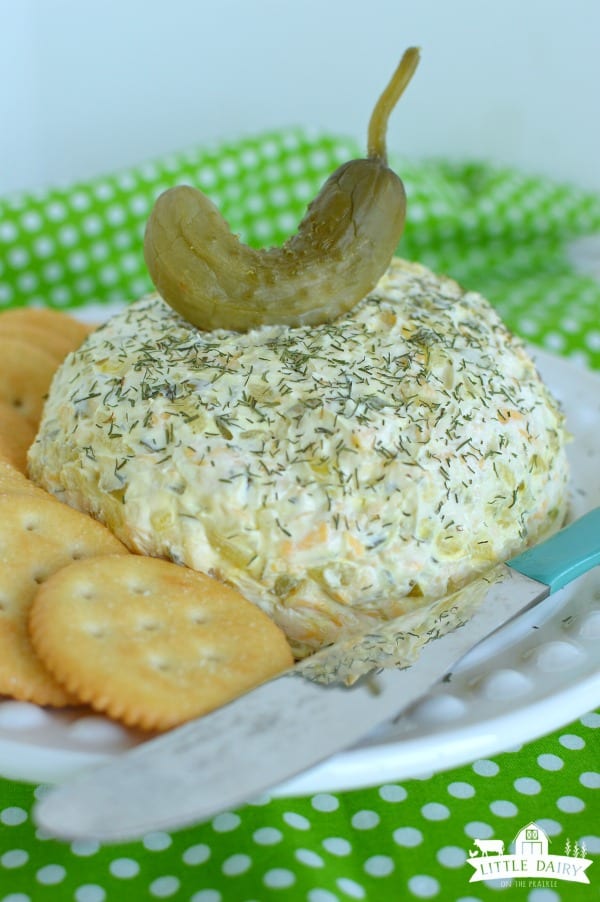
And lucky for you, this isn’t the only pickle-filled starter dish that exists. If you’d still prefer a classic dip with plenty of bread slices and more for dunking, this recipe for a pickle cheeseball will change how you serve appetizers once and for all. Because seriously, if your appetizer selection doesn’t involve pickles, you’ve been doing it all wrong.

The recipe comes from Little Dairy On The Prairie and combines cream cheese, dill spice and dill pickles to create the ultimate topping for crackers and more:

And for yet another cheese and pickle appetizer combination your guests are sure to love, you can also easily make non-traditional cheese sticks by adding a dill pickle to the mix.

The recipe from Delish shows how you can transform pickles by stuffing them with mozzarella cheese, rolling them in an egg wash and bread crumbs and baking them right up.

Jalapeño Honey Beef Jerky

Houston Chronicle

Jalapeño Honey Beef jerky (left) made from slices of top round steak (right) at Chuck’s Food Shack on Thursday, Oct. 25, 2018. Blount marinated the meat overnight and them smoked it for three hours at 165 degrees.

1/2 cup honey
1 jalapeño, thinly sliced (discard seeds for less spice)

1 tablespoon Worcestershire sauce

1/2 teaspoon garlic powder

1/2 teaspoon onion powder
1 tablespoon kosher salt
1 teaspoon cracked black pepper

1 pound eye of round, very thinly sliced

Instructions: Combine honey, jalapeño, Worcestershire, garlic powder, onion powder, salt and pepper with half a cup of water in a saucepan, and bring to a boil. Reduce heat and simmer for 10-15 minutes. Transfer to a bowl and place in the fridge to cool completely.
Place sliced beef in a sealable plastic bag with the marinade and massage to coat. Chill overnight (at least 10 hours).
Heat oven, smoker or grill to 160 degrees.
Related

Recipe: Jalapeño Honey Beef Jerky

Pat-dry the beef strips with a paper towel. Place beef strips in oven, smoker or grill in a single layer. Cook for 3 hours, until jerky is dark and firm, still pliable although not soft. You should be able to bend the jerky without it breaking. Cooking time will vary depending on how thick your beef strips are, so check often.

Allow to cool and store in an air-tight container for 1 hour. To enjoy it at it’s best, eat within 1 week.
Makes 4 servings
Per serving: 347 calories, 9 g fat (3 g saturated fat), 98 mg cholesterol, 644 mg sodium, 18 g carbohydrates, 0 g dietary fiber, 18 g sugar, 31 g protein
Adapted from nourishmewhole.com


Prosciutto Wrapped Shrimp with Jalapeño and Cilantro

By: Chef Gerard Schultz

North Country Outlook

Prosciutto Wrapped Shrimp with Jalapeño and Cilantro

Photo By: Chef Gerard Schultz


I chose to share this recipe because the combination of pork and shellfish are one of the perfect pairings that chefs love to use. This is an easy and elegant appetizer, which combines both shrimp and prosciutto that can be made in a small amount of time. It can also be served on top of a salad or in a small bun as a slider. I like the salty flavor of the prosciutto, the earthy taste of shrimp with the sweet smokey sauce and the spicy jalapeño.


Making the orange chipotle sauce
Yield: approx.  ¾ cup


Ingredients
½  cup & 2 tablespoons mayonnaise
1  whole orange
½  tablespoon shallots, diced
½  tablespoon garlic, diced
1  tablespoon parsley, chopped
3  teaspoons Mao Ploy Sweet Thai Chili Sauce
2 ¼  teaspoons chipotle, ground to a paste

Note: Chipotle paste can be purchased at your local grocery store. If not, take whole chipotles, which are smoked jalapeño peppers. Puree them by using a food processor, blender or by dicing and crushing the peppers with the side of a chef’s knife until a smooth consistency is reached.
Method
Wash the orange.


Take a zester or microplane and carefully remove the zest from the orange. The zest is the darker orange skin on the outside, so avoid going deep into the white bitter pith.
Finely dice the zest.
Cut the orange in half.

Juice the orange and strain to remove seeds.
Place a sauté pan on low heat and add orange juice, garlic and shallots, reducing until almost dry. Let cool.
Combine the remaining ingredients with the juice mixture and puree using a food processor, stick mixer or blender.

Making the wrapped shrimp

Ingredients
8  frozen shrimp, 26/30 or 16/20 size, peeled with the tail removed (thaw overnight) – see note
1  tablespoon olive oil
1  teaspoon fresh garlic, chopped
½  teaspoon black pepper
4  slices prosciutto, thinly sliced and cut in half lengthwise (It is easiest to buy already sliced or have the butcher pre slice the prosciutto paper thin for you)
1  jalapeño, washed and thinly round slices with seeds and all
1-2  ounces cilantro leaves
½  cup chipotle orange sauce (see recipe)
Note: The shrimp numbers denote the size by telling how many you can receive per pound. You can purchase shrimp peeled and deveined (P&D) with the tail on or off. I recommend buying them P&D. I recommend buying them P&D tail off for this recipe.


Prepping the shrimp


Toss shrimp in olive oil, garlic and pepper. Marinate for a few hours or overnight.
Cooking the shrimp
The shrimp can be cooked on a hot grill or by using a sauté pan. Cook the shrimp halfway, which should take a few minutes and let cool.
Making the prosciutto wrapped shrimp
Remove cilantro leaves from stems and reserve.
Slice washed jalapeño pepper into thinly round pieces with the seeds.
Cut prosciutto in half lengthwise.
Lay the 8 slices of prosciutto vertically on a clean counter or cutting board. Place ¼ teaspoon of chipotle sauce about 1 inch from the closest end of the prosciutto. Add 1 slice jalapeño, 1 cilantro leaf on top of the sauce followed by one partially cooked shrimp and repeat with chipotle sauce, jalapeño and cilantro leaf on top of the shrimp. Repeat for the remaining 7 slices.


Carefully roll the shrimp side over with the prosciutto slice tucked inside until fully wrapped. These steps can all be completed 1 day in advance.
Preheat oven to 350 degrees F.
Take a sheet pan and coat with butter or pan spray. Place the wrapped shrimp on the sheet pan and bake for 7 minutes.


Plating the shrimp


Remove from the oven and immediately place on a serving plate and top each piece with a little chipotle mayonnaise and a cilantro leaf.
Enjoy!


Fall for Corn and Sweet Potato Chowder with Jalapeño

The Blade 

By: Mary Bilyeu

Source: Mary Bilyeu

Spice up you fall soup with this jalapeño soup!

It’s soup season.
We may call it fall, but in reality, it’s the time of year when we bring out sweaters and soup recipes to help keep us warm.
With the last precious harvest of fresh sweet corn in northwest Ohio until next year, you can transition from summer’s heat to autumn’s chill with this hearty chowder. (Of course, frozen corn makes a good substitute as winter comes closer and, unfortunately, lingers.) Add both potatoes and sweet potatoes, plus a hint of heat from jalapeños, while cheese and creamed corn add luxurious richness.
This corn chowder is, quite simply, a bowl full of coziness and comfort.

orn and Sweet Potato Chowder with Jalapeño

1 tablespoon butter
2 tablespoons finely chopped onion
1 tablespoon minced jalapeño
½ cup creamed corn
1 cup broth (chicken or vegetable)
1 small-to-medium potato, peeled, finely diced
½ small sweet potato, peeled, diced
½ cup shredded sharp cheddar cheese
Minced cilantro
Salt and pepper
Cornbread, for serving

Melt the butter in a small saucepan over medium heat. Add the onion, jalapeño, and corn; sauté until the onion and pepper have softened, about 5 minutes.
Add the creamed corn, broth, potato, and sweet potato. Bring to a boil, lower the heat to medium-low, cover, and simmer for 10 minutes until the potato and sweet potato are both fork-tender.
Stir in the cheese until it melts, then add the cilantro.
Season with salt and pepper to taste, then serve immediately with cornbread on the side.
Yield: 1 serving½ cup corn kernels (fresh or frozen)


Unraveling Pinterest’s Most Popular Halloween Jalapeño Popper Recipe

BY :Sara Cagle

Brit + Co 


Halloweeño Jalapeño Popper Mummies RECIPE

“I love Halloween foods that, at first glance, are spooky but when looking closer are actually cute and fun,” Williams tells Brit + Co. “When coming up with this recipe, I wanted to make something that brought me back to my childhood but that was still for adults. A reimagined jalapeño popper seemed like the perfect way to go.”
We’re all for nostalgia, but what exactly is it about these snacks that led to hundreds of thousands of pins? “I think it’s because they are so darned cute! I can’t help but smile when I look at a tray full of them,” she says. “Also, once you look at the recipe, you find that there are very few ingredients, and they are relatively simple to make. You can’t really ‘mess up’ wrapping the jalapeños, because there really is no ‘right’ way to do it.”
Check out our step-by-step boo-torial below, sprinkled with a few of our insights, then get to bakin’.

Ingredients:
10 jalapeño peppers
8 ounces room-temperature cream cheese
8 ounces jack cheese or your favorite cheese, shredded (We used mozzarella)
1 green onion, finely chopped
1/2 teaspoon salt
1 package refrigerated crescent rolls (We used Pillsbury Sweet Hawaiian Crescent Rolls)
2 eggs, beaten
candy eyeballs

Directions:
1. Preheat the oven to 400°F

2. In a small bowl, mix the cream cheese, shredded cheese, green onion, and salt until well blended.

3. Slice jalapeños in half lengthwise with seeds removed and stems left on. We accidentally cut the stems off, but they still turned out cute!

4. Roll out the crescent dough, and separate into 4 rectangles (not triangles). Press your fingers into any perforations to seal them.

5. Using a pizza cutter, cut each rectangle into 10 pieces (or as many as you can without making them too thin) lengthwise. It’s tough to get even slices, so don’t worry about making yours perfectly uniform; the mummies are extra endearing when they’re all a little different. We also made closer to 5 slices per rectangle than 10, which was totally fine.

6. Fill each jalapeño half with the cheese mixture. Don’t worry if the halves seem jam-packed; that just means ultimate cheesiness.

7. Wrap one strip of dough around each stuffed jalapeño, leaving a space for the eyes (which you’ll add later). Use two pieces of dough if necessary. Feel free to change up the wrapping style each time for unique mummies.

8. Place jalapeños on a baking sheet and brush with egg mixture, which makes them extra shiny and crisp.
9. Bake for 8 to 10 minutes, or until golden brown. Because our dough strips turned out a little thicker, the mummies took roughly 12 minutes to bake.

10. Remove mummies from oven, and press candy eyes into empty space. Serve immediately.

Final verdict? The measurements for this recipe are just right, and it’s crafty enough to challenge you without giving you a headache. These lovable snacks are spicy and melty on the inside, crispy on the outside, and just the right level of sweet due to the crescent dough. In the words of Williams, “Cute and simple to make? That’s a win/win.”


Chili dip a hit made-from-scratch take on a football favorite

By Tony and Sarah Nasello

Grand Forks Herald 

Add Jalapenos to this easy Chili dip for football season! 
Photo by: Michael Vosburg / Forum Photo Editor

FARGO — My husband, Tony, is a lifelong Miami Dolphins fan, which means that the only thing we usually get to cheer about in our home during NFL football season is, you guessed it, the food.
And last Sunday, my Easy Cheesy Chili Dip had everyone cheering as we watched the Fish eke out a win over the Tennessee Titans.

This recipe was inspired by a popular dip that seemed to be everywhere in the 1980s, which was made by combining a can of chili with a brick of Velveeta cheese. I loved this dip as a teenager, but as an adult I wanted to see if I could create a made-from-scratch version that would replicate the wonderful creamy, cheesy nature of this dip without using any processed ingredients.
Instead of using canned chili, I make a simple, quick chili that takes just 15 minutes to cook and is every bit as satisfying. You can make this recipe using just one dish — an ovenproof skillet — which keeps the dishwashing at a minimum and helps the dip retain its heat better throughout serving. Or, you could cook the chili in a regular frying pan and then transfer it to a pie plate or baking dish to finish in the oven.
I begin by cooking ground beef with aromatics like garlic, onion and jalapeno pepper in just a bit of oil, which imparts deep flavor into the dish and intensifies the meatiness. This chili is best when the ground beef is broken down into small, crumb-like pieces, and I use a handy meat chopping tool to achieve this, but a potato masher or wooden spoon will also work.
Tomato paste, water and a blend of spices and seasoning are added next to round out the chili, with cayenne pepper providing just a touch of heat. For a creamy finish, I stir in four ounces of cream cheese, which gives the chili a lush and velvety texture that makes it firm enough to hold on a chip. We prefer this chili without beans, but red kidney beans could also be added at this stage for a chunkier version.
Once the cream is thoroughly incorporated, I cover the top of the chili with a generous sprinkling of shredded cheddar jack cheese and then bake it in a 375-degree oven until the cheese begins to bubble and brown. For an extra golden brown and cheesy crust, I finish the dip by broiling it on high for two to three minutes, watching it carefully to keep it from burning.
I love the simplicity of this chili, which can be refrigerated for several days, or frozen for up to two months before adding the cheese and baking, which makes me love it even more. When serving, I prefer hearty, restaurant-style yellow corn tortilla chips, which are strong enough to hold a generous mouthful of cheesy goodness.

My Easy Cheesy Chili Dip is like having a plate of super-deluxe nachos without the hassle of soggy chips, which is always touchdown in my book.
Sarah’s Easy Cheesy Chili Dip
Serves: 6 to 8
Ingredients
1 pound ground beef
1 tablespoon canola or vegetable oil
1 large garlic clove, minced
½ cup yellow onion, small-diced
½ jalapeno or serrano pepper, seeded and finely chopped
6 ounces tomato paste
1 cup water
2 teaspoons chili powder
1 teaspoon cumin
½ teaspoon cayenne pepper (add more for extra heat)
¼ teaspoon salt
4 ounces cream cheese, cut into 1-inch pieces
1 15-ounce can red kidney beans, drained and rinsed (optional)
1 ½ cups shredded cheddar jack cheese
Toppings
2 Roma tomatoes, diced into ¼-inch pieces
3 green onions, finely chopped
¼ cup black olives, sliced
Directions
Preheat oven to 375 degrees.
In a 9- or 10-inch oven-safe skillet, heat the oil and add the ground beef, garlic, onions and jalapeno pepper. Cook over medium heat until the beef is fully browned, and the onion is soft and translucent, about 8 to 10 minutes. Use a meat chopper, potato masher or wooden spoon to break the beef into small, crumb-like pieces. Drain the excess fat and return the skillet to the stovetop.
Add the tomato paste, water, chili powder, cumin, cayenne pepper and salt and simmer over medium-low heat for 10 minutes, stirring occasionally.
Add the cream cheese and stir until fully incorporated, then stir in the kidney beans, if using. Smooth the top and cover with the shredded cheese.
Bake in a 375-degree oven for 12 to 15 minutes, until the cheese is bubbly and browned. For best results, finish by broiling on high until the top is a rich, golden brown, about 2 to 3 minutes.
Use a pot holder or handle cover to remove skillet from oven and sprinkle the top with an even layer of the diced tomatoes, green onions and black olives. Serve immediately with your favorite tortilla chips. Leftovers may be refrigerated for up to 3 days and reheated in the oven or a microwave-safe dish.
Sarah’s tips:
• If you don’t have an oven-safe skillet, use a frying pan to make the chili, then transfer it to a 9- or 10-inch pie plate or baking dish and cover with the cheese.
• For extra heat, use the whole jalapeno pepper and/or increase the amount of cayenne pepper.
• Fresh cilantro may also be sprinkled on the top just before serving.
• For best results, serve with hearty, restaurant-style yellow corn tortilla chips.

Pork stuffed jalapeno poppers


News and Tribune 

BY:DAVE LOBECK


Pork Stuffed Jalapeno pepper


Sometimes you want to fix something that is both delicious and fun. A client and friend of mine stopped by the office last Friday and dropped off a batch of jalapeno peppers that he grew in his garden. They were gorgeous. This thoughtful gesture gave us the perfect opportunity to fix something “delicious and fun” with a bit of a ​BBQ My Way​ twist. Let’s get started.
Ingredients
8 to 10 Jalapeno peppers – halved and seeded 1⁄2 cup smoked pulled pork (BBQ My Way​ twist) 1⁄2 tsp ground cumin

1⁄2 tsp cayenne pepper
8 oz block of softened cream cheese 1 1⁄2 cup shredded cheddar cheese
2 eggs plus a dash of milk
1 cup flour
1 1⁄2 Panko bread crumbs
1⁄8 cup of your favorite pork rub
White Alabama Sauce
1 cup mayonnaise
2⁄3 cup apple cider vinegar 1 Tbs black pepper

Juice of 1⁄2 lemon
In a bowl, combine the cheese, the softened cream cheese, the pork, cumin and cayenne pepper. Mix thoroughly. A fork works best.
Cut the peppers lengthwise and scoop out membranes and seeds. I would suggest wearing rubber gloves while doing this and then remove the gloves when you are done. Stuff each pepper with a scoop of the cheese mixture. Place the eggs and milk in one shallow bowl and mix thoroughly, place the flour in a second shallow bowl and the panko crumbs and your favorite pork rub in a third shallow bowl. Preheat the oven to 350 degrees. Roll the cheese stuffed peppers in the flour first, then roll around in the eggs and milk, then coat in the panko crumbs. Place on a cookie cooling sheet which is perched on a cookie sheet. This keeps the peppers elevated. Bake for thirty minutes or so or until the peppers are softened a bit. If the panko isn’t brown enough, set the oven to broil for a few minutes to finish the browning process.
Drizzle with Alabama white sauce and serve with your favorite cold beverage. Delicious, spicy, crunchy, cheesy and smoky all at the same time. Enjoy!

Sweet and sweaty

By: Jason Cassidy 

News Review 


PHOTO BY JASON CASSIDY

Sweet jalapeños in a jar.

My garden sucks this year. Despite a spring spent adding new beds in more favorable locations, as well as an automated irrigation system, my blossoms have dropped en masse. Unfortunately timed heatwaves this summer have robbed me—and many fellow local gardeners to whom I’ve whined—of most tomato and melon fruits. Not all has been lost, though. The lemon cucumber and spaghetti squash yields have been respectable. And the jalapeños—those chilis I most often cook with and always do well in my yard—continue to be on fire. The time was ripe to finally make some “cowboy candy.”
My conventional use for a bumper crop of jalapeños is to combine it with the “too many” tomatoes that I normally enjoy for some homemade pico de gallo for all my tortilla chip and tri-tip-smothering needs. But the absence of tomatoes presented an opportunity for trying out this tasty-looking pickling/candying method of preserving hot peppers that I’ve come across on various recipe websites over the years.
Turns out cowboy candy is super quick and simple to make—especially if you just do the quick refrigerator pickle—and the results are amazing. I’ve tried them on a turkey burger and a grilled-chicken sandwich (both transformative) and spooned them straight out of the jar and into my mouth for an intense sweet/sour/hot snack. It’d also be a perfect contrast to a bagel with cream cheese, and would make a great addition chopped up and stirred into a potato salad or coleslaw.
After making one batch, I think I have a new staple in my fridge.
The recipe I settled on borrows bits from the glut I found online, all of which are basically the same. Other additions that I found but left out of my batch include cayenne pepper (seems overkill), celery seeds (meh) and lime zest and/or juice (next time). I included some whole red jalapeños for extra color, but you could also add a few whole cayenne or, if you’re really brave, habanero peppers to further enhance the look and flavor.
Cowboy candy
Ingredients:
3 pounds jalapeños, sliced
Handful of additional whole chili peppers
(red jalapeño, cayenne, habanero, etc.)
6 cups sugar
2 cups vinegar (apple cider or distilled
white)
1/2 tsp turmeric powder
8 cloves garlic, smashed
Sterilize four or five one-pint pickling jars and lids, plus a slotted spoon and a funnel.
Put on some rubber or plastic gloves. Rinse off your jalapeños and any other peppers you’re using, then cut off the stems and slice into quarter-inch rings. (You could de-seed first if you want less heat … but c’mon!) If you’re including any whole peppers, simply cut off the stems and add to the pepper pile.
Start your syrup by adding vinegar, sugar, turmeric and smashed garlic to a large saucepan and bring to a boil, whisking until sugar dissolves. Reduce to a low boil, and cook for four minutes. With a slotted spoon, remove garlic. Add all your peppers to the pot and boil for another four minutes.
Turn off heat, and with slotted spoon remove peppers and distribute evenly between jars. Turn heat on syrup back up and bring to a boil. Cook for an additional five minutes or so, until syrup begins to thicken. Funnel syrup into jars, covering peppers completely and leaving about 1/2-inch airspace at top. Tighten lids and put in the fridge. Wait one week. Enjoy! Using this refrigerator method for pickling, your cowboy candy will be good in the fridge for at least three months.

Simply the Most Fabulous Fresh Salsa-Pico De Gallo!

By Nicole Carlin

Mother Earth News 


Photo : by Nicole Carlin

This Pico has jalapenos added to the recipe.

There is nothing better than fresh summer fruits and vegetables and this is the time of the year for tomatoes. I have a dear friend who is from Mexico and she was visiting the farm a few years ago in August. After brushing the horses, feeding the pigs and helping collect eggs, we ended up at the garden on a pre-dinner collecting expedition. As we filled the basket with cucumbers, peppers, onions and tomatoes, Sandra exclaimed with delight over my abundant and over-sized jalapenos.

“Do you make pico?” she asked.

“Make what? I asked.

“Pico de gallo! You know fresh salsa!” I love salsa and I had made regular cooked salsa and tomato salads but never this mysterious pico de gallo.

Pico de gallo literally means “beak of the rooster” and it’s not entirely clear where the name comes from though online discussion boards offer two possible ideas. One is that to calm fighting roosters, trainers would put the rooster’s head in their mouth and at first the rooster would peck the tongue similar to the bite of the hot peppers in the pico de gallo salsa. Another is that the finely minced ingredients looked like chicken feed. No matter where the name comes from, pico de gallo is a salsa that originated in Mexico.

In the kitchen, Sandra rummaged through the basket and selected two spectacular heirloom tomatoes, two jalapenos, and two smallish onions. After we finely diced all three ingredients we mixed them in a bowl and seasoned it with salt and pepper. That was it! I expected lime juice or cilantro or some other secret ingredient, but this was how Sandra’s mom had made it so that was that (though many variations do include cilantro and lime).

We split open a new bag of tortilla chips and dug in… and it was AMAZING! Sandra’s kids clustered around the bowl with my kids.

“I can’t stop eating this!”

“Wow, Mom this tastes even better than usual!”

“I don’t care if my lips are burning, give me another chip.” (This from one of my kids who had never willingly consumed fresh jalapenos before)

“Ca

The bowl emptied in five minutes flat. The two older girls began dicing more tomatoes to make another bowl and Sandra explained that the fresh heirloom tomatoes really made the pico taste incredible. Ever since that Sunday afternoon we have regularly made pico de gallo from the beginning to the bitter end of tomato season. Canned salsa is for the winter but pico is for the summer!

Sandra O’s Pico de Gallo
Ingredients

• 1 large tomato
• 1 large jalapeno
• 1 small onion
• salt and pepper to taste

Directions:

1. Wash all ingredients and peel onion.

2. Finely dice the tomato, put into bowl.

3. Finely dice the jalapeno, test for heat level and dice with pith and seeds for a spicier result, remove for a milder version. Add to bowl.

4. Finely dice the onion and add to bowl.

5. Stir together and add salt and pepper.

Hints and Tips:

• We like fresh juicy beefsteak style heirloom tomatoes for pico de gallo but in a pinch any tomato will do, just remember the better the tomato the better the pico.

• Don’t be shy with the salt, add a bit taste and add a bit more if you want to ratchet up the flavor.

• If jalapenos scare you, this is wonderful with bell peppers (it’s just missing that magic spicy kick that I love) I make it with bell peppers for my husband.

• I find this makes a great condiment for scrambled eggs, over corn on the cob, and on top of baked potatoes as well as with quesadillas and other salsa-y applications. Sometimes I just eat it with a spoon, Mmmmmmm. .


Pop these easy bite-size jalapeno poppers into the oven

By: Chula King

Tallahassee Democrat

Wonton Jalapeño Popper Bites.

Photo By: Chula King


Wonton Jalapeño Popper Bites
Total Prep Time – 10 minutes: Total cook time – 15 minutes
Makes 24 Wonton Jalapeño Popper Bites
Wonton Cups:
24 wonton wraps
2 teaspoons vegetable oil
Jalapeño Popper Filling:
4 ounces cream cheese, room temperature (See Note 1)
1/2 cup (4 ounces) sour cream (See Note 2)
1 cup (4 ounces) shredded extra sharp Cheddar cheese
8 ounces bacon, cooked, drained, and crumbled
3 jalapeños, membrane and seeds removed, finely chopped
Directions
Preheat oven to 350° F.
Brush mini-muffin pan cups with 1 teaspoon of the vegetable oil. Press wonton wraps into mini-muffin pan cups. Brush with remaining vegetable oil. (See Note 3)

Bake in preheated oven for 6 to 8 minutes, or until lightly golden brown. Remove from oven to cool.
Jalapeño Popper Filling:
Add cream cheese and sour cream to medium bowl. Beat on high with electric mixer until smooth, about 30 seconds.

Reserve 2 tablespoons each of Cheddar cheese and crumbled bacon. Reserve 1 tablespoon of chopped jalapeños.
Add remaining Cheddar cheese, bacon, and jalapeños to cream cheese/sour cream mixture. Beat on low until well combined, about 30 seconds.
Spoon 2 teaspoons of Jalapeño Popper Filling into each of the wonton cups. (See Note 4)
Sprinkle reserved Cheddar cheese, crumbled bacon, and chopped jalapeños on top.
Bake in preheated 350° F oven for 6 to 8 minutes, or until cheese is melted and filling is hot.
Cool for 10 minutes before serving. (See Note 5)
Yield: 24 Wonton Jalapeño Popper Bites.

Recipe Notes:
1. I used low-fat cream cheese, but you could also use regular cream cheese.
2. I used low-fat sour cream, but you could also use regular sour cream.
3. To easily fit the wonton wraps into the mini-muffin pan cups, I cut 1/2-inch slits on two opposite sides. This allows the wonton wraps to more easily overlap and fit into the mini-muffin cups.
4. I used a 2-teaspoon or #100 ice cream scoop to fill the wonton cups. It was the perfect size!