FLASH IN THE PAN: Vinegar pickles are crisp, satisfying — and versatile

By ARI LEVAUX for Lee Montana Newspapers

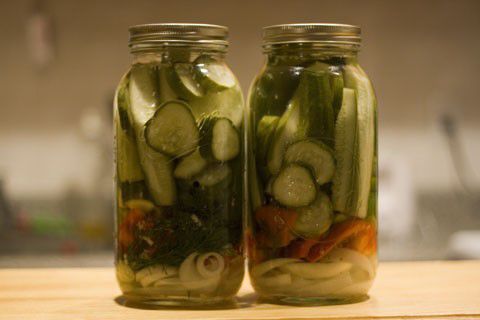
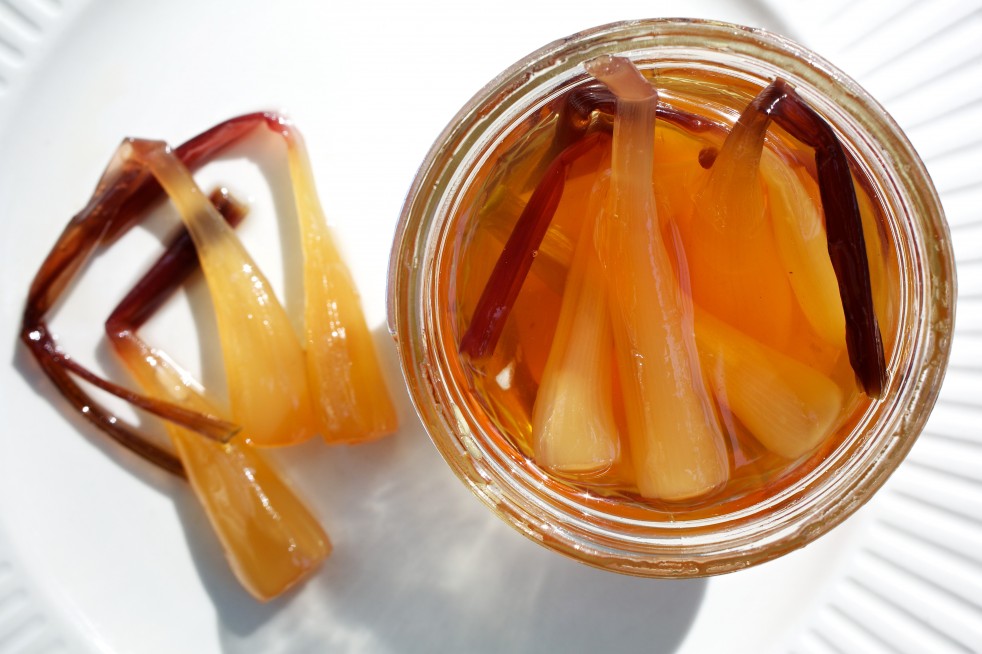
Jars of cucumbers, carrots and onions, looking pretty as they pickle.
Robert Judge

Pickling can happen any time there are ripe veggies for the picking. Now it’s cucumber season, which lasts basically all summer long. Beans are upon us too. Soon come the pickled peppers, large batches in large jars, sometimes with carrots. Then maybe some beets.

Generally speaking, there are two types of pickle: the fermented kind, aka sour pickle, and the pickled-in-vinegar kind, which is more common and goes by many names. Although I love to eat the fermented veggies prepared by others, I remain a novice in that realm.

Vinegar pickles, meanwhile, are a versatile way to go that can accommodate anything you could want to eat pickled, from cauliflower to kohlrabi, not to mention the asparagus that’s already come and gone. I do all of my pickling in basically the same go-to brine recipe. With small adjustments here or there, it works for pretty much anything.

Vinegar, which makes up at least half of any brine, is a powerful preservative. Most brine recipes call for salt and sugar too, both of which also discourage bacterial growth.

For reasons of space, food safety and liability, this is not the place to give a complete set of instructions on how to pickle. My recipe assumes a basic knowledge of canning technique and certain pieces of equipment. For Cliff Notes versions of the canning process, consult the box of lids and rings that come with the jars.

County extension offices are usually great sources of information on food preservation. This publication(https://www.pubs.ext.vt.edu/content/dam/pubs_ext_vt_edu/348/348-594/348-594_pdf.pdf) from Virginia Tech’s county extension office is a fantastic overall primer on canning methods and materials. You can also consult Ball Canning, the company that produces both Ball and Kerr jars. Ball scientists have prepared and safety-tested recipes that are very easy to follow and hard to screw up. They will also try to sell you things like Ball Kosher Dill Pickle Mix, a blend of salt and spices. If you want to use your own salt and dill, such recipes can be annoying.

But as you mature and gain confidence as a canner, you can figure out how to customize a recipe to suit your needs.

My default recipe was developed for pickled peppers, but part of why it is so versatile and awesome is the mustard seeds, which add a dimension of flavor. And when the pickles are gone, they leave behind a brine full of pickled mustard seeds that can be used in many ways, including grinding the seeds into homemade mustard. Or you could just stick some more veggies into the jar, top off the salt and vinegar, and make a round (or two) of fridge pickles.

Ari’s Pickle Principles

Use Kirby-style, aka pickling cucumbers–the kind with the little bump/spikes on them. These can withstand higher temperatures, without getting soggy, than slicing cukes. They should be small, no more than five inches long and an inch or so wide, and fresh. I like to hit the farmers market in the cool of the early morning, load up, and get them into jars ASAP.

Pack the washed cucumbers into sterile quart jars, leaving an inch of head space at the top.

To get a sense of the quantity of brine you need, fill one packed jar with water, and then measure that amount of water by pouring it into a measuring cup. Multiply that amount by the number of packed jars you have.

The brine is half water and half vinegar, with the vinegar part being half cider vinegar and half white wine vinegar, both of which I purchase in gallon jugs. I like the cider vinegar for the flavor, but if you want the visual of a pristine white brine, use only white wine vinegar. Plain white vinegar is kind of nasty but gets the job done.

Heat the brine on medium, adding sugar a little at a time until it doesn’t quite taste sweet but takes the edge off the vinegar–about a tablespoon per quart.

While the brine heats, add a tablespoon of mustard seeds to each jar, and a tablespoon of salt. Since mustard seeds come in both yellow and brown colors, I mix them first before doling them out.

When the brine reaches a boil, pour it into the jars so it covers the veggies and still leaves a half-inch of head space. Wipe the rims clean and screw on the lids.

Process in a water bath for the appropriate time based on the vegetable being pickled. With cucumbers that would be 15 minutes.

Honestly, I usually skip the cooking step, especially for the peppers, as they stay crispier–albeit at the expense of safety. Like any home canner should always do, I inspect each jar carefully. If a seal is broken or the contents don’t seem right I toss it. Soggy pickles definitely get tossed, because that isn’t right.

Living life on a pickle’s edge isn’t for everyone, and for liability reasons I need to stress that if you even consider not cooking your pickles you will immediately contract botulism and your house will burst into flames.

Assuming you fall in line and cook your cukes, they can still come out crispy enough if you use Kirbys that are young and fresh, and add a grape or horseradish leaf, or some other tested form of leaf tannins, to the jar.

And if those aren’t crispy enough, then keep a batch of fridge pickles going. Or maybe it’s time to venture into sour pickles, which aren’t cooked either. The lazy crispy pickle.

Ari LeVaux writes Flash in the Pan, a syndicated weekly food column carried in more than 60 newspapers nationwide. Though his audience is national, he says he “always writes about Montana. Usually.”

Finish Line: Be proactive about probiotics

Hot dog with sauerkraut and jalapenos

It’s the Fourth of July, folks, and for most of us, that means a day off from work, fireworks and a great excuse to eat hot dogs.

Now, hot dogs aren’t the best food out there, but you’ve got to admit, you get a hankerin’ to eat one when you smell them cooking. Recently I found out some amazingly cool facts about sauerkraut, that now, in my twisted mind, makes it OK for me to eat hot dogs. Let me explain.

In one of my recent columns, I talked about the gut/brain connection and how the health of our gut can actually affect our mood. There is a connection between gut health and mental health. While on my quest to learn more about the gut and how it influences our stress levels, I came across some fascinating information about probiotics and just how important these little critters are for us to feel good.

According to Courtney Collett, graduate student in medical dietetics at The Ohio State University, most of our immune system resides in the gastrointestinal tract and we have more than 40 trillion bacteria cells in there helping keep the gut doing what it’s supposed to do.

Probiotics are simply high concentrations of that good bacteria the gut needs to perform optimally. This is important because as we age, our microbiomes change because of diet, medications, stress and health issues. Apparently even being less active can affect these little guys. You can buy probiotics over the counter and there are some really good ones out there like Align, but they can be pricey at about $30 for a box of 24 tablets.

You’ll also need to know what you’re looking for, since not all probiotics are the same. When reading the label, look for what microbes are inside, how many live microorganisms are in each dose, the health benefits they promise and storage information (many need to be refrigerated).

If you are lazy and cheap like me, a tastier and healthier way to boost your probiotic count is to consume foods like yogurt, miso soup, kefir, tempeh, buttermilk, sour pickles and sauerkraut. These are key foods for natural probiotics to feed and thrive on. Yes people, pickles, yogurt and sauerkraut can make you healthier and happier.

If you are traveling for the holidays or for business, pay attention to what you’re eating and put yogurt on the list as a must-eat every morning and throw in a pickle or two at lunchtime. Traveling throws off the gut for a multitude of reasons, making it all the more important to add in those probiotics. Jet lag, exposure to sick people in the airport and on the plane and uncommon regional foods can disrupt the gut. Mood is easily affected by how we physically feel, so make your diet a crucial component of your stress reduction regiment.

So go enjoy some fun with the family today and eat a hot dog or two, with sauerkraut, of course. You can even put some tempeh on there, although I honestly have no idea what that is and cannot be held responsible for what it might do to your hot dog.

Davana Pilczuk has a doctorate in kinesiology and specializes in helping individuals and teams perform better at work, in sports, or in life. Follow her on Twitter @DavanaHPG or contact her at davanapilczuk@hotmail.com.

Spice Up Your Life! Jalapeño Avocado Cream Cheese Wontons

Jalapeno Avocado Cream Cheese Wontons

Every now and again we all need a little spice in our life. Well, today we get a look at a recipe that will not only add some spice to your life but will also do so with some stunning flavor. Today we get a look at a recipe for some Jalapeño Avocado Cream Cheese Wontons.

This interesting and flavorful combination comes from the creative culinary genius’ at Cake N Knife and certainly will be a new favorite. This recipe is essentially a fried, upgraded version of jalapeno cream cheese poppers. The spicy filling and fried exterior come together for something incredible that will eventually be your favorite snack. This is certainly nothing to sleep on, and definitely worth your time and effort. Check out the recipe right here, right now and give us your thoughts on the results below. Keep it locked for more great recipes coming soon.

Photos provided by Cake N Knife

Jalapeno cheddar corn cakes

By Renee Peace Carr, WUSA

Jalapeno Cheddar Corn Cakes

Easy, cheesy jalapeno cheddar corn cakes make the perfect side at any barbeque or summer party.  Thanks for b Restaurant for the recipe!

Ingredients:

4 cups cooked corn kernels

2 ea jalapeno diced

1 cup sliced scallions

8 eggs

1 cup white cheddar cheese

¼ cup olive oil

1 cup flour

1 coup cornmeal

1 tsp salt

1 tsp pepper


Instructions:

Pulse corn kernels in food processor a few times to chop up.  Place in bowl with remaining corn, jalapeno, eggs, cheese and eggs.   Stir to combine

In separate bowl combine dry ingredients, add in wet corn mixture to flour and stir gently to combine.

Drop 2 oz batter into 3’ circles on an oiled flat top and cook 2 minutes on each side.

Want more articles like this? Follow Great Day Washington on FacebookTwitter & Instagram for more! Watch every day at 9am on WUSA9.

Jalapeño Corn Dog Bites

Jalapeno Corndogs


Ingredients:


  • 1 box Jiffy cornbread mix
  • 3 tablespoon cream corn
  • 1/4 cup milk
  • 1 egg
  • 1/2 cup shredded cheddar cheese
  • 1-2 tablespoon diced jalapeño
  • 1 package hot dogs


Directions:

  1. Preheat oven to 400 degrees.
  2. Spray a mini muffin tin well with nonstick cooking spray.
  3. In a medium sized bowl whisk together the cornbread mix, egg, creamed corn, jalapeños, milk and cheese till blended.
  4. Using a small cookie scoop, fill the muffin containers 2/3 full.
  5. Cut each of the hot dogs into 1/8ths and place the hot dogs in the center of each muffin tin.
  6. Bake for 15-20 minutes or until golden! Serve warm!

Recipe: Zesty Carrots, Hot Peppers and Shallot Stir-Fry

Only 86 calories per serving!

By 

Stewed leek and carrot slices in frying pan with jalapenos and vegetable oil on the wood table

This quick and simple recipe is the perfect vegetable side dish that uses jalapenos to spice up any meal. The jalapenos, ginger and garlic are especially aromatic as you cook.

Ingredients

1 tablespoon extra-virgin olive oil
4 cups carrots, sliced
3 shallots, sliced into thick rings
2 garlic cloves, minced
1 1/2 teaspoon fresh ginger, peeled and minced
1/2 jalapeno, stemmed, seeded and minced
1/2 teaspoon Chinese Five Spice
1 teaspoon sea salt
1/4 teaspoon red pepper flakes
2 green onions, thinly sliced

Directions

  1. Mince the jalapeños, ginger and garlic. Slice the shallots into rings.
  2. In a large sauce pan heat olive oil over medium-high heat and add the carrots and shallots.
  3. Sauté for 4 to 5 minutes, then add the garlic, ginger, jalapeños, Chinese Five Spice, salt and red pepper flakes.
  4. Sauté for 4 to 5 more minutes and add the green onion to finish. Carrots should be tender but still crisp in the center.

Chef’s notes: If Chinese Five Spice is not available, you can simply leave it out. However, if you can find this seasoning, it adds a flavorful touch to the dish. To peel ginger quickly and safely use the edge of a small spoon and scrape the peel away from the ginger root to remove all the skin before chopping.

Nutrition information

Each serving (1/4 of dish) contains:

Calories 86
Fat 4g
Saturated fat 0g
Cholesterol 0mg
Fiber 2g
Protein 1g
Carbohydrate13g
Sodium 346mg

Sweet and Sour Onion Pickle

By Deb Lindsey   –   The Washington Post

Deb Lindsey for The Washington Post
Sweet and Sour Onion Pickles

Use this onion pickle as a condiment on a sandwich or added to cheese or eggs. Use the first onions of spring, not grocery store scallions.

You will need 1 quart of non-chlorinated water and 2 half-pint canning jars with rings and new lids; see the NOTE, below.

Substitute 24 ramps or wild garlic, or combine all three, pickling only the bulbs. What about the greens or scapes that remain? Chop them and wilt in olive oil over high heat, and add to a frittata or Spanish tortilla.

Make Ahead: The onions need to marinate twice – once in salt water for 12 to 24 hours and once in the pickling brine for 12 to 24 hours. The canned onion pickle needs to cure for 2 weeks before serving. Unopened jars can be stored in a cool, dark place for up to 1 year.

SERVINGS:

Tested size: 12 servings; makes 2 half-pint jars

INGREDIENTS
  • 2 tablespoons kosher salt
  • 8 to 12 plump spring onions (about 12 ounces total), extremely fresh and very clean
  • 3 cups apple cider vinegar
  • 2 cups sugar
  • 1 tablespoon pickling spice

DIRECTIONS

Fill a stainless-steel or glass bowl with 1 quart of cool, non-chlorinated water. Stir in the salt. Closely trim away the roots from the end of each onion, then cut off the greens. Add the onions to the salt water; top with a plate to keep them submerged. Drape the bowl with a tea towel and let it rest for 12 to 24 hours.

Drain the onions, rinse well under cool running water, then drain again.

Combine the vinegar, sugar and pickling spice in a nonreactive (stainless-steel) 3-quart saucepan; bring to a boil over medium-high heat, stirring until the sugar has dissolved and formed a light syrup. Add the onions; once the syrup returns to a boil, cook for 10 minutes. Remove from the heat, cover and let the mixture rest in the saucepan for 12 to 24 hours.

Prepare for water-bath canning. Bring the onions in the syrup to a rolling boil over high heat. Use a slotted spoon to lift the onions out of the syrup and pack them into the sanitized jars, filling each jar no more than two-thirds full. Boil the syrup for 5 minutes, until slightly thickened.

Add the thickened syrup to the jars, leaving 1/2 inch of head space. (You might have syrup remaining; it makes a sinful addition to a gin cocktail and a surprising sip over ice with sparkling water.)

Run a chopstick or flat plastic knife along the inside of the jars to dislodge any air bubbles. Clean the rim of each jar with distilled white vinegar to cut residual oils, place the warmed lids on and finger-tighten the rings (not too tightly). Process in the boiling water bath for 15 minutes (see NOTE, below). Turn off the heat and let the jars rest in the pot for 10 minutes. Use a jar lifter to transfer the jars to a clean, folded dish towel to cool for several hours.

Label and date the sealed jars. Store in a cool, dark place for up to 1 year. Let the onions cure for at least 2 weeks before serving, during which time any of their sharp flavor that remains will mellow.

NOTE: Water-bath canning safely seals high-acid, low-pH foods in jars. The time for processing in the water bath is calculated based on the size of the jar and the consistency and density of the food. For safety’s sake, do not alter the jar size, ingredients, ratios or processing time in any canning recipe. If moved to change any of those factors, simply put the prepared food in the refrigerator and eat within a week.

Fill a large canning kettle or deep stockpot two-thirds full with water. To keep the jars from rattling against the pot, place a rack in the pot. (A cake rack works well; a folded dish towel is equally effective.) Sanitize the jars in a short dishwasher cycle or by boiling them in a canning kettle or pot for 10 minutes. Fill a small saucepan with water and add the rings. Bring to a boil over high heat, slip in the lids and turn off the heat.

Use a jar lifter or tongs to lower the filled, sealed jars into the boiling water bath, keeping them upright. When all of the jars are in place, the water should be 1 to 2 inches above the jar tops. Add water as needed. Bring the water to a low boil before starting the timer for processing.

At the end of processing, turn off the heat and let the jars sit in the water bath until the boiling has stopped. That will reduce siphoning, in which the food burbles up under the lid, breaking the seal. Use the jar lifter or tongs to transfer the jars to a folded towel, keeping them upright. Leave the jars until they have completely cooled, at least 12 hours. Remove the rings and test the seal by lifting each jar by the lid. The lid should hold fast. Label and store in a cool, dry, dark space.

Spicy Whiskey BBQ Sliders

By Ree Drummond   –   Today.com

Nathan Congleton / TODAY
These BBQ Sliders use pickled jalapeno slices to spice them up.

COOK TIME:

PREP TIME:

YIELD:

12 sliders

These sliders are slightly spicy thanks to the jalapenos, really flavorful and delightfully messy. They are great when there’s a big game on TV or if you find yourself suddenly with a houseful of hungry men. They’re slightly spicy, incredibly flavorful, and super messy in a wonderful way! The little jalapeño slices absolutely make the dish.

Technique tip: Turn off the open flame before pouring in the whiskey!

Swap options: You can use ground turkey instead of beef. Instead of making sliders, make meatballs and serve with toothpicks instead of buns.

Ingredients

    • 2 pounds ground beef
    • Salt and freshly ground black pepper, to taste
    • 4 tablespoons salted butter, plus more for buns
    • 1 large onion, diced
    • 1/2 cup whiskey
    • 1/4 cup jarred jalapeño slices, plus more to taste
    • 1 cup barbecue sauce
    • 12 slider buns, split

Preparation

1. Form the meat into 12 miniature patties and season them with salt and pepper on both sides. Melt the butter in a large skillet over medium-high heat and cook the patties until just about done in the middle, approximately 3-5 minutes per side. Remove from the skillet and set aside. Drain off all but 2 tablespoons of grease, then return the skillet to the stove.

2. Add the diced onion to the skillet and cook over medium-high heat, stirring, about 3 minutes.

3. Turn off the flame and pour in the whiskey. Turn the flame back on to medium heat, stir, then allow the whiskey to reduce by half, 2-3 minutes. Stir in the jalapeños and the barbecue sauce. Reduce the heat to low and place the patties in the barbecue sauce, turning to coat. Allow the patties to simmer in the sauce until everything is hot and bubbling. Season with salt to taste.

4. Lightly butter and toast the buns. Serve the sliders on the buns with extra sauce on the side.

Recipe: Pimento Cheese Jalapeño Beef Burger

By Shannon Weber   –   St. Louis Post-Dispatch

Pimento Cheese Jalapeño Beef Burger

Serves | 6 |

If you prefer a slightly smoother texture to your pimento cheese, skip the hand-mixing and instead pulse in a food processor to blend.

Pimento Cheese

  • 8 oz block sharp cheddar cheese, grated (do not use pre-grated cheddar)
  • 1/4 cup cream cheese, at room temperature
  • 1/4 cup mayonnaise
  • 3/4 tsp kosher salt
  • 1/2 tsp chile flake
  • 1/2 tsp onion powder
  • 1/2 tsp worchestershire sauce
  • 1/2 cup pimentos, drained (7 oz jar)

Jalapeño Beef Burgers

  • 2 lbs ground chuck, near room temperature
  • 1/4 cup vegetable or grapeseed oil
  • 6 hamburger buns, split
  • 3 Tbsp salted butter, melted
  • 1 jar pickled jalapeños, drained
  • kosher salt and fresh ground black pepper

Preparation – Pimento Cheese

Stir all ingredients but pimentos together in a large bowl until well combined. Add pimentos and stir until evenly distributed. Transfer to glass jar, seal and refrigerate for at least 1 hour or until ready to use.

Preparation – Jalapeño Beef Burgers

Prepare grill for high heat; clean and oil grates. Divide ground chuck into 6 equal portions and pat firmly into patties, making a depression in the center of each. Brush burgers on one side with oil, season with salt and pepper, and place on grill. Cook 5 minutes. Brush with oil, season the top and flip; cook for 3 to 4 minutes longer. During the last 1 to 2 minutes of cooking, scoop pimento cheese on top of each burger and close grill lid to melt. When cheese has melted, remove from grill, brush bun halves with butter and grill until toasted.

To Serve

Place burgers on buns, top with pickled jalapenos, and serve immediately.

Balsamic Jalapeño Grilled Steak

  • From inmamamaggieskitchen.com

Balsamic Jalapeno Steak

2 pounds steak

1/4 cup balsamic vinegar

2 tablespoons olive oil

2 jalapeños, finely diced

1/4 teaspoon black pepper

5 cloves of garlic, finely diced

Trim any visible fat. Place steak in a resealable plastic bag. Add all the ingredients. Turn to coat all sides of the meat with the marinade. Let sit in the refrigerator for at least 4 hours. Overnight is best. When ready to cook, take the meat out of the refrigerator. Heat the grill to 350-375 degrees, medium heat. Cook for 10-15 minutes on each side, depending on the thickness of the meat. Meat is done when the second side “bounces back” or the internal temperature 145 degrees for medium rare, 160 degrees for medium, 175 degrees well done. Let meat rest for 10 minutes in a foil tent before slicing.