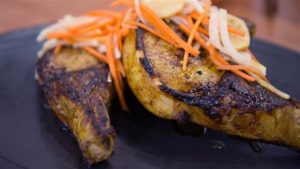
Maple-Turmeric Pork Chops with Pickled Carrots and Daikon

By Sam Talbot – Today.com

Nathan Congleton / TODAY

COOK TIME:

PREP TIME:

SERVINGS:

4

This filling dish mixes savory pork with bright, fresh pickles. The pickles can be made up to 3 days ahead.

Ingredients

    • 3/4 cup plain yogurt (not Greek-style)
    • 2 teaspoons grated peeled turmeric root
    • 1 tablespoon grated garlic
    • 1/2 cup pure maple syrup
    • 4 (1/2-pound) bone-in pork chops (about 1 1/2 inches thick)
    • 1 teaspoon black pepper
    • 3½ teaspoons kosher salt
    • 8 ounces carrots, peeled and cut into matchsticks
    • 1 large daikon, trimmed and cut into matchsticks
    • 1 cup apple cider vinegar
    • 1 cup water
    • 1 (1-inch) piece ginger, peeled and sliced
    • 2 teaspoons yellow mustard seeds
    • 2 tablespoons peanut oil

Preparation

1. Combine the yogurt, turmeric, garlic, and 1/4 cup of the maple syrup in a large zip-top plastic freezer bag. Sprinkle the pork with the pepper and 2 teaspoons of the salt. Place the pork chops in the bag with the marinade; seal and turn to coat. Chill, turning occasionally, at least 8 hours or overnight.

2. Place the carrots and daikon in a medium bowl. Combine the vinegar, 1 cup water, ginger, mustard seeds, and remaining 1/4 cup maple syrup and 1½ teaspoons salt in a small saucepan. Bring to a simmer over medium-high. Pour the mixture over the carrots and daikon in the bowl. Cool to room temperature; cover and chill at least 8 hours or overnight.

3. Preheat the oven to 400°F. Remove the pork from the marinade; discard the marinade. Heat the oil in a large ovenproof skillet  over medium-high. Add the pork chops; cook until deep golden brown, about 4 minutes. Turn the pork chops, and transfer the skillet to the preheated oven. Bake until a meat thermometer inserted into thickest portion registers 140°F, about 5 minutes. Remove from the oven; let stand 10 minutes. Serve with the pickled daikon and carrots.

Reprinted with permission from 100% Real: 100 Insanely Good Recipes for Clean Food Made Fresh by Sam Talbot. 

Hot Italian Sausage Sandwich

By MARIO BATALI   –   ABC.COM

Jalapeno Mustard Adds Spice to this Great Sandwich

ingredients
FOR THE JALAPENO MUSTARD:
  • 1/2 cup white wine
  • 1/2 cup white wine vinegar
  • 1/4 cup yellow mustard seeds
  • 1/4 cup brown mustard seeds
  • 2 tablespoons shallots (peeled and minced)
  • 1 jalapeno (minced)
  • 1 tablespoon Kosher salt
FOR THE PICKLED ONIONS:
  • 1 1/2 cups distilled white vinegar
  • 1 cup water
  • 1/2 cup sugar
  • 1 tablespoon Kosher salt
  • 2 large red onions (peeled and thinly sliced)
FOR THE HOT ITALIAN SAUSAGE:
  • 2 tablespoons olive oil
  • 4 hot Italian sausage links (butterflied open)
  • 1 head radicchio (quartered lengthwise with root end attached)
  • 4 slices pepper jack cheese
  • Kosher salt and freshly ground black pepper
FOR THE SANDWICH:
  • 4 hoagie rolls (lightly toasted)
directions
  • For the Jalapeno Mustard: >In a small bowl combine the wine, vinegar, yellow and brown mustard seeds, shallots, jalapeno and salt. Allow to steep overnight. Lightly puree and store in an airtight jar until ready to use.
  • For the Pickled Onions: In a medium sauce pot, combine the vinegar, water, sugar and salt and bring to a boil. Add the sliced onions to a large heatproof bowl and pour the hot vinegar mixture over the top. Allow to stand at room temperature until cool. Transfer to a glass jar until ready to use.
  • For the Hot Italian Sausage: Heat a griddle to medium high heat. Toss the sausage links with olive oil and place on the hot griddle, cook until charred. Toss the radicchio with olive oil, salt and pepper and cook until charred, about 3 minutes. Top each sausage link with a piece of cheese and continue cooking until melted. Remove from the griddle and keep warm. Slice the radicchio and set aside.
  • For the Sandwich: Spread the jalapeno mustard on the top and bottom of the toasted rolls, top with a link of sausage followed by the pickled onions and charred radicchio. Serve immediately.
  • Tip: Throw an ice cube on your griddle and cover with a metal bowl to create a steam bath to melt the cheese.
Similar categories: Sandwiches Italian


Pimento Grilled Cheese

Your favorite sandwich, with a Southern twist

BY JAKE COHEN   –   Tasting Table

Photo: Rachel Vanni/Tasting Table

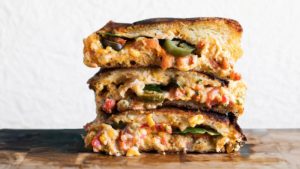
We’re no strangers to a good grilled cheese sandwich. From a bagel grilled cheese to one filled with ricotta and berries, we’ve seen, and happily eaten, it all. But when Sam Talbot opened Pretty Southern in Brooklyn, we fell hard for another grilled cheese. Homemade pimento cheese is stuffed between focaccia (they call their thin version “magic bread”) with tomatoes and pickled jalapeños for a spicy and cheesy sandwich that’s beyond addictive.

We love this pimento cheese on its own, too, so feel free to make a few grilled cheeses and put out the rest with some crudités and crackers. But if you’ve never experienced this Southern staple warmed between two pieces of bread, brace yourself.

To learn more, read “Spread the Love.”

Pimento Grilled Cheese

Recipe adapted from Sam Talbot, Pretty Southern, Brooklyn, NY

Yield: 4 sandwiches

Prep Time: 15 minutes

Cook Time: 10 minutes

Total Time: 25 minutes

INGREDIENTS

For the Pimento Cheese:

4 ounces extra-sharp cheddar, coarsely grated

4 ounces white cheddar, coarsely grated

1 cup drained pimento or roasted red peppers, finely chopped

½ cup mayonnaise

2 tablespoons Dijon mustard

2 tablespoons hot sauce

1½ tablespoons dried parsley

1 tablespoon Worcestershire sauce

½ tablespoon lemon juice

¼ yellow onion, finely grated

Kosher salt and freshly ground black pepper, to taste

For the Pimento Grilled Cheese:

Four 6-inch focaccia rolls, halved

20 pickled jalapeño slices

2 vine-ripe tomatoes, thinly sliced

Pimento cheese

1 stick unsalted butter, divided

DIRECTIONS

1. Make the pimento cheese: In a large bowl, stir all of the pimento cheese ingredients until smooth.

2. Make the grilled cheese: Preheat the oven to 400° and place a wire rack on a sheet pan. Lay out the bottoms of the focaccia rolls on a cutting board and top each with 5 pickled jalapeño slices. Divide the tomato slices among the bottoms, followed by the pimento cheese, then add the tops of the focaccia rolls, and press to close.

3. In a large cast-iron skillet, heat 2 tablespoons of the butter over medium heat. Place 2 of the sandwiches in the pan and place a heavy pan on top to weigh them down. Cook until golden, 3 to 4 minutes. Flip the sandwiches, add 2 more tablespoons of butter and cook, replacing the pan on top, until the other sides are golden, 3 to 4 minutes. Transfer the sandwiches to the prepared sheet pan and repeat this process with the remaining sandwiches and butter.

4. Bake the sandwiches in the oven until the cheese is completely melted, 5 minutes, then cut each in half and serve.

Old-Fashioned, Crunchy, Fermented Garlic-Dill Pickles

By

Pickles are one of my favorite ferments!

In this video, you’ll see beautiful fermented Garlic-Dill Pickles. They are so easy to make at home.

And by the way…

These are NOT your regular vinegar pickles you’ll find in the grocery store.

Nope!

Instead, these are fermented with salt. Once pickled, there’s an explosion of vitamins, enzymes, probiotics, beneficial acids, and most importantly… a delicious crunch!

These are so good, and they’re really easy to make!

Here’s the video, and below that is the written out recipe…

By the way, in the video I mentioned this FREE Fermenting Formulas Cheat Sheet — it’s a gift from me to you. Here’s a link to grab it.

Fermented Garlic-Dill Pickles

These pickles are fermented with salt for an explosion of vitamins, enzymes, probiotics, beneficial acids, and most importantly… a delicious crunch!
Makes 1 gallon pickles in this 1-gallon stoneware crock from Ohio Stoneware.
Author: Wardee Harmon
Recipe type: Cultured, Snacks
Ingredients
  • pickling cucumbers (or thin-skinned Mediterranean cucumbers) — enough to fill the crock (I needed a few dozen) and as fresh as possible
  • ½ gallon good water (filtered if municipal water)
  • 6 tablespoons unrefined sea salt
  • 12 peeled garlic cloves (optional, for flavor)
  • 4 teaspoons dill seed (optional, for flavor)
  • 1 teaspoon black tea leaves (or a few fresh grape or oak leaves)
Instructions
  1. Submerge cucumbers in cold water for 10 to 30 minutes to crisp them up.
  2. Meanwhile, make the brine by combining the water and sea salt.
  3. Stir well to dissolve the salt.
  4. Cut the ends off each cucumber.
  5. Start packing the crock with cucumbers.
  6. Every so often, sprinkle in some dill seeds, a few cloves of garlic, and some black tea. If you’d prefer, omit the dill seeds and garlic and add celery seed or peppercorns, etc. instead.
  7. Keep packing the cucumbers, stopping to sprinkle more of the other ingredients along the way.
  8. When the crock is full to within 3 to 4 inches of the top, stop adding ingredients.
  9. Pour the brine over all of it so the cucumbers are submerged.
  10. Place the stone weights on top — they will make sure the cucumbers stay below the surface of the brine.
  11. Add the lid of the crock.
  12. Now leave the cucumbers to ferment at room temperature for 3 to 7 days. (Shorter if temps are warmer; longer if cooler. In the video, it was winter and the house was cooler so I fermented these 4 to 5 days.)
  13. When they are done, remove the lid and plates/weights. It is completely normal to see bubbles at the top and also for the brine to get cloudy.
  14. Taste your pickles! They should be crunchy and salty. They may not be fully pickled through the entire cucumber but that’s okay. They’ll continue to “pickle” in cold storage.
  15. Transfer to a gallon sized glass jar and store in the fridge. You can eat them right away or let them age longer in the fridge. Enjoy!

More About The 1-Gallon Stoneware Crock

I used the 1-gallon stoneware crock kit from Ohio Stoneware in this demo.

Hands down, it’s one of my favorite kitchen tools. We ferment in it all the time — sauerkraut (video demo and recipe here), pickles, kimchi, and more.

I highly recommend it!

Thank you to Ohio Stoneware for providing it and for being such a wonderful supporter of fermented foods. ????

Tasty with a kick: Baked rice with jalapeño cheese

If you are not afraid of some spice in your food, try this tasty baked rice with jalapeño cheese recipe.

JOL Staff   –   JOL

Photo Credit: Yehuda Solomon

Tnuva USA is sharing a nice recipe that your whole family will love. This recipe makes six servings and will take you only about 20 minutes to prepare.

Ingredients:

A little bit of olive oil for greasing the pan

2 cups (300 grams) cool or cold cooked rice

4 large eggs

1 carton of Tnuva’s Creamy Soft Cheese 9%

100 grams of Tnuva’s Kashkaval Chunk, roughly grated

½ cup of cilantro, finely chopped

½ tsp. of dried jalapeño flakes or chili flakes

Salt and pepper to taste

200 grams small champignon mushrooms

Directions:

1. Grease 6 ovenproof containers of approximately 250 ml. each with olive oil. Place the containers on a large baking tray and preheat the oven to 180 degrees Celsius.

2. In a large bowl, mix the cooked rice with the eggs. Add the carton of creamy soft cheese, ¾ of the Kashkaval and the cilantro. Then, sprinkle with the chili flakes, salt and pepper and mix well.

3. Chop the champignon mushrooms into thick slices. Save the middle slice from each mushroom for the garnish and then roughly dice the rest of the slices and mix into the rice bowl.

4. Divide the mixture among the greased fireproof containers. Place three slices of mushroom on top of the rice in each container and then sprinkle the remaining Kashkaval on top, along with a few more chili flakes. Bake in the center of the oven for about 25-30 min until the rice has browned and its center is stable. Serve hot.

For more delicious Tnuva recipes, click here


Bacon wrapped peach bites

By Lori Lesley   –   Stephenville Empire-Tribune

I am always looking for an easy, but delicious appetizer to serve at gatherings. This one is great especially when fresh peaches are in season. This recipe is from Paula Deen and was given to me by a friend in Savannah.

Bacon wrapped peach bites with jalapenos

1 12-ounce package of thick cut bacon, slices halved crosswise

3 large jalapeños, seeded and cut lengthwise into 8 slices each

4 large fresh peaches, peeled, pitted and cut into 6 wedges each

1/4 cup red pepper jelly

1/4 cup white balsamic vinegar

1/8 tsp ground black pepper

Preheat oven to 425 degrees. Line a large rimmed baking sheet with foil. Place bacon pieces in a single layer on pan.

Bake until bacon slices are just beginning to brown, 5-8 minutes. Remove from oven and drain on paper towels. Place one jalapeño slice on 1 peach wedge, and wrap with one piece of bacon. Secure with a toothpick. Repeat until all are done. Then bake 15 minutes, turning once.

In a small bowl, whisk together pepper jelly, vinegar and pepper. Remove peaches from oven and brush with jelly mixture. Bake until bacon is golden brown, about 5 minutes more.


Weekly Pour: Blood Orange Jalapeno Margarita at Tortilla Flats

By Karen Dandurant   –   Fosters.com

The Bar: Tortilla Flats

1-11 Brickyard Square

Epping

(603) 734-2725

www.tortillaflatmexican.com

The Bartender: Sarah Smith

Age entered the industry: 20, I went into a local burger place with a T-shirt that had skulls on it. The owner liked my shirt and hired me.

What she likes about the job: It’s like being a chemist, making up new drinks. I like making people happy, regulars and new customers.

A good story: I like watching people on first dates. It can be really funny, or awkward. You can tell how it’s going and sometimes I can help them out.

On winning the lottery: I would buy a house in one of the new neighborhoods in Florida built by Disney. It includes free admission to the park. I’d like that.

Dream job: I’d be a video game tester. I am a super nerd.

The Drink: Blood Orange Jalapeno Margarita

2 oz. house-infused jalapeno tequila

.5 oz. Cointreau

Blood orange syrup, to taste

Top with house-made lemon-lime mix.

Serve on the rocks in a salt-rimmed glass.

Garnish with a lime slice and a few jalapeno slices.

Sidetrack shows us how to make the perfect fried pickles

Posted By    –   Detroit Metro Times

Photo by Tom Perkins – Beer battered fried pickles at Sidetrack.

Fried pickles are one of those bar food dishes that, on the face of it, seems so foolproof. Take a pickle, batter it up, drop it in the deep fryer, and in a moment you get a salt, garlic, and vinegar bomb inside a crunchy shell. Impossible to do wrong, right?

Well, not exactly. As Sidetrack in Ypsilanti shows us with its beer battered fried pickles, a dish for which the bar/grill is famous, putting a little thought into the batter goes a long way. Instead of the standard issue, dark, heavy-fried pickles one typically encounters at the bar, Sidetrack encases its spears in a batter that’s light and fluffy in texture but also crisp. That’s a delicate balancing act, one partly achieved with a corn starch and flour combo that helps prevent the batter from becoming tough, and partly a result of an IPA infusion.

Can’t make it to Sidetrack this evening? Want to impress everyone with your knowledge of properly prepared fried pickles? Co-owner Jessica French was kind enough to show us how Sidetrack fries up their spears.

Ingredients:

2 quarts of vegetable oil for frying
1 large pickle, quartered into spears
1.5 cups cornmeal
1/4 cup flour
Fry mix (like Dixie Fry)
Fresh IPA
More beer
*Fresh beer is important as carbonation is the key to a fluffy, golden brown fried pickle.

Preparation:

1. Heat the oil to 365 degrees in a deep fryer or heavy, deep skillet.
2. Dip the pickle spears in beer.
3. Pour the cornmeal and flour into a shallow pan and add a few splashes of beer to moisten the mixture. Mix it well.
4. Add pickles to the mix and tumble gently. Make sure to get an even coating.
5. Dip the coated pickles in the hot oil. Fry until they’re golden brown and slightly crisp, then drain them on paper towels.
6. Drink the remaining beer!

Cross Section Beer Battered Pickle Spears


Roast Jalapeño Biscuits and Gravy

The perfect spicy snack for a crowd!

BY JAKE COHEN   –  Tasting Table

Photo: Rachel Vanni/Tasting Table

When it comes to biscuits and gravy, it’s important to let nothing go to waste, which is why we’ve devised the ultimate crowd-feeding snack plan for using every last bit of dough. Enter: the biscuits and gravy tray.

After cutting out the biscuits, we form the scraps into a pan-sized edible tray with holes perfect for filling with gravy. We spice things up with roast jalapeños in the biscuits and spicy chorizo in the gravy. Trust us, this is gonna be your new favorite party trick.

The key to perfect biscuits is to keep everything cold. Their height comes from a combination of leaveners, combined with specks of butter in the dough that steam in the oven to create flaky layers. To maximize this equation, freeze your butter before you grate it (pro tip: Use a food processor for a quick and easy method that won’t tire out your arms); that way, it won’t melt into the dough as you knead it with your hands.

Some would even go so far as to freeze the bowl and flour before starting. Depending on how hot your kitchen is, that’s not a bad idea. Just make sure to work fast, so the ingredients will stay cold and the biscuits will be ready sooner.

To learn more, read “Gravy Train.”

Roast Jalapeño Biscuits and Gravy

Recipe from the Tasting Table Test Kitchen

Yield: 10 to 12 servings

Prep Time: 45 minutes, plus freezing time

Cook Time: 55 minutes

Total Time: 1 hour and 40 minutes, plus freezing time

INGREDIENTS

For the Biscuits:

3 garlic cloves, unpeeled

2 large jalapeños

5 cups all-purpose flour, plus more for dusting

2½ tablespoons baking powder

1 tablespoon granulated sugar

1 tablespoon kosher salt

1 teaspoon baking soda

1 teaspoon smoked paprika

5 sticks unsalted butter, frozen and coarsely grated

2 cups heavy cream

½ cup cilantro leaves, minced

For the Gravy:

2 tablespoons olive oil

1 pound cooked, uncured chorizo, minced

2 garlic cloves, minced

1 Vidalia onion, minced

1 jalapeño—stemmed, seeded and minced

4 tablespoons unsalted butter

¼ cup all-purpose flour

2 cups whole milk

Kosher salt, to taste

For Baking and Serving:

4 tablespoons unsalted butter, melted

Espelette pepper, for garnish

Flaky sea salt, for garnish

Finely chopped chives, for garnish

DIRECTIONS

1. Make the biscuits: Preheat the broiler. Place the garlic and jalapeños on a sheet pan and broil, turning as needed, until well charred, 3 minutes for the garlic and 5 to 6 minutes for the jalapeños. Transfer to a small bowl and cover with plastic wrap to steam for 5 minutes. Then, peel and mince the garlic, and stem, seed, peel and mince the jalapeños.

2. In a large bowl, whisk together the flour, baking powder, sugar, salt, baking soda and paprika. Add the butter and toss to combine with the dry ingredients. Add the cream and, using your hands, knead until a crumbly dough forms.

3. Transfer to a clean work surface and add the reserved minced garlic and jalapeños with the cilantro, and knead until smooth.

4. Shape into a rectangle and lightly dust with flour. Roll into a 9-by-12-inch rectangle and fold into thirds like a letter. Dust again with flour and rotate 90°. Repeat the process of rolling out and tri-folding 2 more times.

5. Dusting with flour as needed, roll the dough into a 12-by-15-inch rectangle. Using a sharp knife, trim ¼ inch off each edge of the rectangle and discard to allow proper rising. Transfer the rectangle to a parchment-lined sheet pan. Using a 2¼-inch fluted ring cutter, cut 12 biscuits out of the rectangle, spacing each cutout ½ inch apart.

6. Place the biscuits on another parchment-lined baking sheet, 1 inch apart from each other. Wrap each pan with plastic and freeze, 2 hours to overnight.

7. Meanwhile, make the gravy: In a medium saucepan, heat the olive oil over medium heat. Add the chorizo and cook, stirring often, until golden, 6 to 8 minutes. Add the garlic, onions and jalapeño, and cook until softened and beginning to caramelize, 8 minutes.

8. Stir in the butter to melt, then stir in the flour and cook for 1 minute. Slowly pour in the milk until incorporated and bring to a simmer. Cook, stirring often, until thickened, 5 minutes. Season with salt and set aside.

9. Preheat the oven to 400°. Take the pan of biscuits and the biscuit scraps out of the freezer and discard the plastic. Brush both with the melted butter and sprinkle with a pinch of Espelette pepper and flaky sea salt. Bake, rotating halfway through, until golden brown and puffed, 20 minutes for the biscuits and 25 minutes for the scraps. Transfer the scraps to a platter and arrange the biscuits all around.

10. Reheat the gravy and spoon into the holes of the biscuit scraps. Garnish with chives and serve.

Beefy & Spicy Mac and Cheese

Reposted from Riverbender.com

posted by: bacchaiking@hotmail.com

Ingredients:
    • 1 package (7-1/4 ounces) macaroni and cheese
    • 1 Tablespoon Salt
    • 1 pound ground beef
    • 1/4 cup chopped onion
    • 1-1/2 cups salsa(spice to taste)
    • 1/2 cup fresh or frozen corn
    • 3 tablespoons diced pimientos
    • Shredded sharp cheddar cheese
    • Chopped tomato
    • 1/2 cup Pickled Nacho Sliced Jalapenos
Directions:
  • Combine in a large bowl salsa, corn, jalapenos and pimientos
  • Chop your Onion and Tomato as desired
  • Set aside cheese sauce mix from macaroni and cheese; cook macaroni according to package directions(add salt)
  • Meanwhile, in a large saucepan, cook beef and onion over medium heat until meat is no longer pink; drain(almost completely). Add the salsa, corn, jalapenos and pimientos; cook until heated through.
  • Drain macaroni; add to beef mixture with contents of cheese sauce mix. Cook and stir until blended and heated through. Sprinkle with cheese and tomato. Yield: 4-6 servings.Note: The milk and butter listed on the macaroni and cheese package are not used in this recipe.
About this Recipe:

It only takes about 20-30 minutes to make this recipe, less if you have everything prepared ahead of time which is wise. It’ll make 4-6 reasonable sized servings, last time I made this, as shown in the picture, I doubled all the ingredients and was able to serve 7 with everyone going back for seconds and still having a little left over for the next day. It also preserves well and tastes just as good second time around 😀 Hope you enjoy.