Get yourself into a pickle

August 5, 2015 by on Columnists, Maine Dish – ellsworthamerican.com

We Americans love our pickles; sweet pickles, sour pickles, tiny gherkins, bread and butter pickles, pickle chips and more.

The term pickle is derived from the Dutch word pekel, meaning brine. Every cuisine has its own variation of pickled vegetables. Here in North America, pickles are traditionally made from “brining” cucumbers in a mixture of vinegar, water and salt and allowing the mixture to ferment for a period of time.

Before the industrial food system became the norm, frugal homemakers and farmers would ferment crocks of cucumbers as a way to preserve the harvest and enjoy in the colder winter months. No general store, delicatessen or butcher shop was complete without a crock of pickles on the countertop, selling them to eat at once.

I like to grow cucumbers, and our family has enjoyed many varieties of pickles for years. When Deb Suran, a talented garlic farmer in Deer Isle, gifted me with 10 pounds of pickling cucumbers last summer, I decided to bring back the crock.

To find a recipe took some digging in older cookbooks and journals, as it seems that these old-fashioned pickles were actually made in barrels. My 10 pounds of cucumbers was a mere fraction of a typical barrel that weighs in at around 450 pounds!

The key to a good pickle is the acidity of the brine. Be sure to use vinegar that it is at least 5 percent acidity. White vinegar allows the herbs to be the more dominant flavor; a combination of cider and white vinegar has a more robust flavor.

Salt is another critical ingredient. Don’t use table salt, it has a non-caking agent that makes the brine cloudy. Check the labels carefully. Look for pickling salt, canning salt, kosher salt or sea salt.

As with most recipes, there is plenty of room for the cook’s creativity. Garlic scapes, cilantro tops, and hot peppers all add different flavor dimensions and levels of heat. If you can wait, the pickles are best if the cucumbers brine for at least a month, then taste test.

I’ve kept these pickles for over a year. The last time I served them they were still crisp and finger-lickin’ good.

Cheryl Wixson lives and cooks in Stonington. She welcomes food-related questions and comments at cw@cherylwixsonskitchen.com.

Old-fashioned Crock Pickles

10 lbs. pickling cucumbers

2 qts. vinegar

2 qts. water

¾ cup (150 grams) pickling salt or Maine sea salt

3-5 heads fresh dill blossoms

6 dried bay leaves

2-3 heads fresh basil blossoms

4 Tbsps. dill seed

10-12 cloves fresh garlic

Scrub the cucumbers and pack into a crock or five-gallon pail. Add the dill and basil blossoms, dill seed, fresh garlic, and bay leaves.

In a saucepan over medium heat, dissolve the salt in the water and vinegar. Pour over the cucumbers, making sure that they are completely covered. Refrigerate for about 1 month, and then taste one for flavor. Keep refrigerated until ready to serve. These pickles keep extremely well, for a year or longer.

Nutritional analysis per 80 gram pickle (varies with size): 14 calories, 3 grams carbohydrates, 0 grams protein, 931 mg. sodium, 0 grams fat, 0 grams fiber.

Fermenting Revolution: The Universal Fermented Pickle Recipe

By Kevin West – MotherEarthNews.com – 7/27/2015 8:57:00 AM

Making fermented pickles requires us get friendly with bacteria.

As discussed in my previous post, a pickle is nothing more than a vegetable preserved in an acidic brine. Acid is the silver bullet against botulism and also gives pickles their signature tangy taste. For quick pickles, often called vinegar pickles, the brine is acidified with vinegar.

In making fermented pickles, also called brined pickles or lacto-fermented pickles, the brine acidifies naturally, thanks to the activity of beneficial lactobacillus bacteria. The microbiology is fascinating and complex, but all you really need to know is that the beneficial lactobacillus bacteria occur naturally on the vegetables you’ll pickle, and the fermenter’s role is to encourage them to do their thing. In one sense, fermenting is akin to gardening. Gardening requires patience, diligence, and careful attention, but you don’t actually make the garden grow. Instead, you create the conditions for the garden to flourish as nature takes it course. Likewise, with fermenting, you don’t make the ferment bubble, but you do tend the microenvironment of your ferment in order to foster conditions favorable to the beneficial bacteria. And, just as the gardener takes steps to discourage weeds, you take steps to discourage undesirable microorganism such mold and yeast.

Some people prefer the unique, rich flavor of traditionally fermented pickles (kosher dills, for instance) to the sharper flavor of vinegar pickles, but to me the most significant difference between the two classes of pickles is that fermented pickles are a raw, live, pro-biotic food. (See Michael Pollan’s New York Times Magazine article here for an overview of research linking our bodies’microbiome, including gut flora, to health.) In my experience, the effect of fermented pickles on digestion is noticeable and beneficial.

Many firm vegetables—including cucumbers, summer squash, green beans, turnips, and green tomatoes—can be fermented. The only essential ingredients apart from the vegetables themselves are sea salt and bottled water.

The 6 Elements of Successful Fermenting

The six basic elements of all successful ferments are: vegetables, water, salt, aromatics, time, and care. At the bottom of this post, I’ll give you my Universal Fermenting Recipe, which is basically a simple ratio of salt to water with some added aromatics.

But the real secret to successful fermenting lies in your attention to the Six Elements, so I’ll start with each in turn.

Vegetables: As with all preserving, good results begin with good ingredients. Choose fresh, crisp, young vegetables picked at the height of the growing season. Rinse well, and trim the blossom end of cucumbers and squash to remove enzymes that can cause the pickle to soften. Vegetables can be sliced (zucchini spears), chunked (large cucumbers or squash), or left whole (green beans, small cucumbers, small green tomatoes).

As for greens: many dark leafy greens will develop an unpleasant chlorophyll taste. But when fermenting turnips I’ll sometimes add a handful of the tops, and trimmed chard stems make a good pickle.

Water: Tap water from municipal water systems has been treated with chlorine or chloramine to kill microbes. It will disrupt the beneficial bacteria you’re trying to encourage in your ferment. Always use bottled spring water instead.

Salt: Salt adds flavor, hardens the vegetables’ pectin to make pickles crunchy, and regulates bacterial growth. The brine will taste quite salty at first, but a portion of the salt is absorbed by the vegetables, and everything comes out right in the end.

Unrefined sea salt is the best choice. Salt’s weight-by-volume varies substantially with flake size, and sea salt will come closest to the recipe measurements. (Kosher salt, which is much flakier, will under-salt the brine.) Unrefined sea salt also contains trace minerals that yield a crunchier pickle.

Incidentally, there is no “right” amount of salt in a brine. The standard ratio of 5% salt by weight is a useful guideline, not a fixed rule. A less-salty brine will ferment faster, and extra salt will slow down a ferment. In summer’s heat, stick with the recipe below.

Aromatics: Be generous with aromatics, such as whole garlic cloves, sprigs of fresh dill and whole dill heads, and whole spices including black peppercorns, dill seeds, and caraway seeds. My recipe below gives suggestions, but don’t feel constrained by them. Other options include fresh horseradish, dried red chilies, and pearl onions.

Incidentally, one often sees the advice to add grape leaves or oak leaves to a ferment, the idea being that their tannins help crisp the pickle. It’s a nice touch, but not at all necessary.

Time: As mentioned, fermenting is a natural process, and it requires time to work. Warmer temperatures accelerate the process, and colder temperatures slow it down. In a comfortable room, around 70 degrees, the brine will begin to cloud in two days. Within three to four days, it will start to bubble and sour. The pickles will be half-sour in about a week, and fully sour in two weeks. At 80 degrees, the whole process might happen in a week. In a cool cellar, it might take three weeks or more. In a cold refrigerator, fermentation occurs imperceptibly over the course of months.

Care: Because of the variables inherent to each ferment (salt and temperature), the only way to judge your pickles’ process is to inspect them carefully. You can’t leave a crock or jar unattended for a week and expect good results. Instead, look at the pickles daily. Make sure they stay submerged (more on that below). Expect to find a thin film of yeast to form on the brine surface and maybe even tiny pinheads of mold. Don’t worry about these signs of life. Skim off the floaters and wipe the wall of the crock or jar if necessary. As long as you keep the micro-garden of your ferment well “weeded” by skimming daily, everything will be fine.

Once the pickles start to sour, taste daily. Once they are soured to your liking, put them in the fridge for keeping. They will last a month or longer.

Universal Fermented-Pickle Recipe

Yields about 2 quarts

2 pounds sturdy vegetables, such as Kirby cucumbers, small zucchini, green beans, baby turnips, or green tomatoes
• 6 4-inch sprigs fresh dill (including seed heads, if available)
• 6 cloves garlic, lightly crushed
• 1 tablespoon black peppercorns
• 1 tablespoon dill seed
• 6 level tablespoons sea salt (2.25-2.5 ounces)
• 2 quarts bottled spring water

1. Wash and trim the vegetables, and pack into a one-gallon jar or crock. Tuck in the dill, garlic, and other aromatics as you go.

2. Dissolve the salt in the water, and pour over the vegetables to cover. Weight the vegetables with a plate so that they remain completely submerged. Alternatively, fill a Ziploc freezer bag with brine, and use it to submerge the vegetables. (Make extra brine using the same proportions if necessary). If using a jar, loosely close the lid. (Do not seal it so because gases produced by the ferment need to escape.) If using a crock, cover it with a plate or board to keep out unwanted visitors.

3. Store the ferment in a cool, dark place, and check daily. Skim any scum or flecks of mold. Insure that the vegetables remain submerged. The pickles will begin to sour in less than a week. You can eat them at any point in the fermenting process. Once soured to your likely, transfer the pickles to the refrigerator, and keep submerged in brine. They will keep for a month or longer.

In a real pickle

By Kitsey E. Burns – kburns@civitasmedia


yadkinripple.com

Who doesn’t like a pickle? Ok, well, I’m sure there are some who don’t, but that’s OK, more for us! Summertime is in full swing and my cucumber vines are producing like crazy. I’m pretty excited about it because I love to can pickles. This year I am growing a regular green pickling cucumber as well as a white cucumber. Both of these varieties look great in jars.

My biggest problem is making sure to check the vines thoroughly every day, otherwise I end up with a cucumber the size of a zucchini and too large to can. I have had quite a few that were almost too big, but I hated to waste them so I sliced them into spears to can.

So far this year I have made several different kinds of pickles and at the rate my vines are producing, I’ll probably make a few more kinds before summer is over. I have made a few batches of a spicy dill pickle, grape leaf pickles and I tried a Sriracha pickle as well.

I prefer salty, sour and spicy pickles. I’m not a sweet pickle fan, but my dad does like bread and butter pickles so I will probably make a batch of those for him. The spicy dill pickle is really simple to make and the recipe is actual for a small batch so it’s great if you just have a few cucumbers from your own garden or the local farmers market. You can always increase the recipe to make a larger batch.

This year I’m also attempting to make some pickles the really old-fashioned way — in a stone crock. My mamma bought this crock at an auction a number of years ago and it has been sitting in our basement ever since. Last year, at my friend’s suggestion, I made a jar of fermented pickles. They were very different, but delicious, and fermented foods are supposed to be very good for you. I’m hoping my pickles fermented in the crock will turnout well.

Grape leaf pickles are my personal favorite, but that wasn’t always the case. I remember as a child we always canned green beans, tomatoes, stuffed peppers and pickles every summer. We normally just made dill pickles or sweet pickles, but one year Mamma wanted to make grape leaf pickles. Everything my mamma ever cooked or prepared was normally delicious, but something didn’t go well with the pickles and they were terrible. It was a family joke for a long time. A few years after that, I tried some grape leaf pickles that my cousin had made and they were delicious. Now they are one of my favorites.

Grape leaf pickles do tend to be on the salty side and not everyone likes them. My dad and fiancé both dislike them, but my great Uncle Ken and I love them so I made a special batch this year. I was particularly proud of the labels I made for my jars. I found a picture of my mamma and me when we were canning pickles a few years ago and printed that out to use as the label for the jars.

Speaking of labels, if you like to can and give your canned goods away as gifts, there are tons of free label templates you can find online to make your canned gifts look really nice. Add ribbons or other extras to make them even more special. Most people realize the time and effort it takes to can and it’s not something a lot of people do anymore so most will consider a home-canned gift a very special treat.

If you have a good pickle recipe, I’d love to try it, email me at kburns@civitasmedia.com or call me at 336-518-3049.

Small Batch Spicy Garlic Dill Pickles (recipe adapted from www.thekitchn.com)

• 2 pounds pickling cucumbers (sliced or cut into spears)

• 1 1/2 cups vinegar

• 1 1/2 cups water

• 2 tablespoons pickling salt

• 6 garlic cloves, peeled (2 per jar)

• 1/4 teaspoon crushed red pepper per jar (3/4 teaspoons total)

• 1 teaspoon dill seed per jar (3 teaspoons total) (I have also used dill weed and added some additional fresh dill from garden and it works great.)

• 1/2 teaspoon black peppercorns per jar (1 1/2 teaspoons total)

Directions: In a large saucepot, combine vinegar, water and salt. Bring to a simmer. Arrange jars on counter and dole out the spices to each. Pack the cucumber slices firmly into the jars. Pour the brine into the jar, leaving approximately ½ inch headspace. Makes three pints. Tap jars gently on countertop to dislodge any trapped air bubbles. Apply lids and let jars cool. When they’ve returned to room temperature, place jars in refrigerator. Let them sit for at least 48 hours before eating. (This recipe is intended to be for refrigerator pickles, but I prefer to heat my lids and waterbath my jars so I can store them in my canning closet. I almost always double or triple this recipe to make larger batches at a time.)

Kitsey E. Burns is a reporter for The Yadkin Ripple where she shares her musings on food, life and love. She can be reached at 336-679-2341 or on Twitter @RippleReporterK.

Jalapeños bring zing to enchiladas

By Linda Gassenheimer, Tribune News Service

Published: July 21, 2015, 6:00 AM

www.columbian.com

Tortillas have become part of mainstream American cooking, and it’s no surprise. Whether made from flour or corn meal, they’re easy to use and are readily available.

Cooking the tomato sauce with whole jalapeño peppers gives it just a hint of hot spice. If you have a passion for hot peppers, cut them up and leave them in the sauce when it is served. If you don’t have jalapeño peppers, then just add a few drops of a hot pepper sauce.

Fred Tasker’s wine suggestion: Enchiladas with zingy jalapeños call for a wine with lots of sweet fruit; the high-acid goat cheese calls for a high-acid wine. One of the crianza-style Spanish riojas fits both bills.

Helpful Hints:

• A quick way to wash the cilantro is to immerse it in a bowl of water for several minutes while you prepare the other ingredients. Lift it out of the bowl and dirt and sand will be left behind. Shake dry and use.

• Jarlsburg or cheddar cheese can be substituted for Monterey Jack.

• Minced garlic can be found in the produce section of the market or in jars in the condiment section.

Countdown:

• Preheat oven to 400 degrees.

• Make enchiladas.

• While enchiladas are in oven, make salad.

Shopping List:

Here are the ingredients you’ll need for tonight’s Dinner in Minutes.

• To buy: 1 can reduced-sodium crushed tomatoes, 1 red onion, 2 large jalapeño peppers, 1 bag washed, ready-to-eat salad ¼ pound goat cheese, 1 bottle ground cumin, 1 bottle ground coriander 1 bunch fresh cilantro, 1 package frozen diced green bell pepper, 1 package frozen corn kernels 1 package 6-inch light flour tortillas and 1 package shredded reduced-fat Monterey Jack cheese.

• Staples: Minced garlic, reduced-fat oil and vinegar dressing, salt and black peppercorns.

Goat Cheese Enchiladas

Makes 2 servings.

Serve with the Sweet Corn Salad as a side dish (recipe below).

For the sauce:

1½ cups reduced-sodium, canned crushed tomatoes

½ cup diced red onion, plus 2 tablespoons, divided use

2 large whole jalapeño peppers

Salt and freshly ground black pepper

For the filling:

¼ pound goat cheese

2 teaspoon ground cumin

1 tablespoon ground coriander

2 teaspoons minced garlic

¼ cup chopped fresh cilantro

1 cup frozen diced green bell pepper

4 6-inch light flour tortillas

2 tablespoons shredded reduced-fat Monterey Jack cheese

Preheat oven to 400 degrees. Line a baking tray with foil.

Make the sauce: Place crushed tomatoes, ½ cup onion and whole jalapeño peppers in a medium-size saucepan and bring to a boil. Reduce heat and simmer gently, uncovered, for 10 minutes. Add salt and pepper to taste.

Make the filling: Mix goat cheese, cumin, coriander, garlic, cilantro and green bell pepper together in a bowl. Divide into 4 portions. Dip the tortillas, one at a time, into the tomato sauce. Make sure they are completely covered with sauce. Remove to the baking tray and spoon one quarter of the filling into the center of each tortilla. Roll up. Spoon half the remaining sauce over the top and cover with foil. Place in the oven for 10 minutes. To serve, remove jalapeño peppers from sauce left in the pan. Place 2 enchiladas on each plate and spoon remaining sauce over the top. Sprinkle with grated cheese and remaining 2 tablespoons onions.

Per serving: 466 calories (45 percent from fat), 23.3 g fat (13.8 g saturated, 6.6 g monounsaturated), 49 mg cholesterol, 25.3 g protein, 49.2 g carbohydrates, 16.2 g fiber, 824 mg sodium.

Sweet Corn Salad

Makes 2 servings.

1 cup frozen corn kernels

4 cups washed, ready-to-eat salad

2 tablespoons reduced-fat oil and vinegar dressing

Defrost corn by placing it in a colander and running hot water through it or microwave on high 2 minutes. Add to the salad and toss with the dressing.

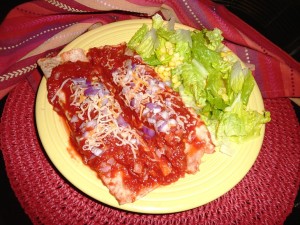
Per serving: 87 calories (18 percent from fat), 1.8 g fat (0.2 g saturated, 0.5 g monounsaturated), 1 mg cholesterol, 3.3 g protein, 17.9 g carbohydrates, 3.5 g fiber, 14 mg sodium.Goat Cheese Enhiladas with Jalapenos

Okra Pickled in the Mexican Fashion recipe

By Judy Walker, NOLA.com | The Times-Picayune
Follow on Twitter

A recipe printed in 1997 originated with chef Katie Sutton ofTthe Hess Collection Winery in Napa Valley.

Okra Pickled in the Mexican Fashion

Makes 6 pints

1 pound okra

1/4 cup salt

6 cups water

3 cups cider vinegar

2 medium onions, thinly sliced

10 garlic cloves

1 cup vegetable oil

7 bay leaves

1 bunch each marjoram and thyme

2 stems oregano

Salt to taste

1 pound jalapeno peppers

1 pound carrots, thinly sliced

Pierce okra in several spots and sprinkle with the one-fourth cup salt. Cover with cold water and let stand for two hours; drain.

In a large pot, combine water, vinegar, onions, garlic, oil, bay leaves, marjoram, thyme, oregano and salt to taste. Bring to a boil; add jalapenos, carrots and okra. Return to a boil; then ladle into hot, sterilized jars to within one-eighth inch of the top. Attach sterilized lids and rings. Process in a boiling water bath for seven minutes, according to lid manufacturer’s instructions.

Store in a cool, dark place. Prepare at least one week before using; their best flavor develops in three to four weeks.

Holy Jalapeños! Try these recipes

By Connie Anderson    http://www.andalusiastarnews.com/

Our trips out West have me thinking more about pepper. We are growing several kinds: gypsy and banana are the sweeter ones and we have my favorite—jalapeño. The jalapeño was named for the town of Jalapa, Mexico, where it was originally marketed. The fruit skin may show a brown netting pattern called corkiness which does not affect the flavor. Because the thick fruit walls keep the pod from drying naturally on the plant, the mature red jalapeños may be dried by smoking them over mesquite or another hardwood, and the product is called chipotle. My husband has planted some seed of some other hot ones that interested him: chile de arbol which as the name says is to be tree like. He has also obtained seed of chiltipen. This is the wild ancestor of all Capsicum annuum varieties. It likes to grow in dappled shade and is a perennial plant. If a freeze occurs it can come back from the root. It produces a small round hot pod. He also has a Texas bird pepper which is similar to the chiltipen. His hero, Thomas Jefferson, grew the bird pepper. Several of these seeds have come from Native Seeds in Tucson, Ariz., which does a nice job of promoting sustainable gardening and saving seeds from sources in the western deserts. We like to visit every time we go to Tucson. I buy beans and other products. My husband buys plants and seeds, although the plant sale this year was another month away. One of their seasons is the monsoon season in July which gives a lot of plants a good start.

Capsicum species are members of the family Solanaceae, the nightshade family, which includes eggplant, petunia, potato, tobacco, and tomato. They are not related to the black pepper, Piper nigrum, which is a tropical vine. Botanically, chile peppers are perennial subshrubs when grown in their native habitats but we in the more temperate areas grow them as annuals.

Chiles originated in the Americas. By the time the Spanish arrived in Mexico there were already dozens of varieties. Christopher Columbus, too, sent seed back to the Old World and they were planted extensively in the Portuguese and Spanish colonies resulting in even more diversification. Within 100years, chiles had circumnavigated the world and were growing everywhere in temperate and tropical climates.

Our favorite place to stop when we pass through Las Cruces, N.M., is in the old town of Mesilla which, of note, was the Confederate capital of the Arizona Territory. We love the posole at Ándele. This year we discovered something new (to us, anyway) — a pickled jalapeño. We learned we needed to roast the mature jalapeño, peel it and soak it in soy sauce and lime juice (3:1 ratio) for three days. Less time and it will be hotter. We really liked this pepper.

Last year I bought The Complete Chile Pepper Book. To roast and peel pepper pods, first cut a small slit in the pod close to the stem end so that the steam can escape. The pods can be placed on a baking sheet and put directly under the broiler, or on a metal screen on top of a burner. The author suggests the easiest method is to use a barbecue grill. Place the pods on a grill 5 to 6 inches from the coals or gas flames and turn them often. Blisters will soon form, indicating that the skin is separating. Be sure that the pods are blistered all over before you take them off the grill or they will not peel properly. The pods may burn slightly, but take care that they do not blacken entirely or they will be overcooked and will be nearly impossible to peel.

Taken from The Everything Tex-Mex Cookbook by Linda Larsen.

Jalapeño Poppers

Makes 24

12 small jalapeño peppers

¼ pound chorizo sausage

1 ½ cups shredded Cheddar cheese

2 eggs, beaten

½ teaspoon salt

1/8 teaspoon pepper

¼ cup cornmeal

¼ cup flour

½ cup finely crushed corn flakes, cereal

Vegetable oil

1 cup Nacho Cheese Sauce

Cut jalapeño peppers in half and gently remove seeds and membranes. In heavy skillet, over medium heat, brown chorizo sausage until thoroughly cooked; drain and let cool for 10 minutes. Mix with cheese.

Stuff the cheese filling into jalapeño halves. Combine eggs, salt, and pepper in shallow bowl. Combine cornmeal, flour, and crushed cereal in another shallow bowl. Dip each stuffed jalapeño in egg, then into cornmeal mixture to coat. Set on plate, cover, and chill for at least 1 hour.

When ready to serve, heat 1” of vegetable oil in deep heavy skillet over medium heat until temperature reaches 350 degrees F. Fry stuffed jalapeños for 2-4 minutes until brown and crisp. Serve with warmed Nacho Cheese Sauce.

Try this Pig & Whiskey-inspired BBQ jalapeno popper dip and sandwich spread recipe

Posted By on Mon, Jul 13, 2015 at 12:26 pm

If you want to prepare for the Metro Times’ gut-busting, boozy Pig & Whiskey Festival in Ferndale this weekend, or you’re unable to make it but still want to experience a bit of it at home, check out this inspired recipe from Zeke’s Rock & Roll BBQ. Tested out over the weekend on 7 Action News This Morning, this BBQ jalapeno popper dip and sandwich spread incorporates the creaminess of a cheddar and cream cheese spread with the kick of the spicy peppers and applewood smoked bacon.

What you’ll need:
12 jalapenos
1 lb cream cheese
1/3 cup milk
1/3 cup shredded cheddar cheese
6 stripes applewood smoked bacon
Panko bread crumbs

Roast 12 jalapenos, remove skin, dice
Add 1 pound of soft cream cheese in a pot with 1/3 cup milk on low heat.
When creamy, add 1/3 lb shredded cheddar cheese. Fold in until creamy.
Remove from heat, add diced jalapenos.
Cut up six strips applewood smoked bacon and mix with cheese and jalapenos.
For the dip, top with panko bread crumbs, then heat in oven for 20 minutes at 350-degrees.
for a spread, skip the bread crumps and oven process and simply apply to a bun.

Wait, don’t throw out that watermelon rind; use it to make some tasty pickles: David’s Daily Dish

By David Holloway | dholloway@al.com ; www.al.com
Email the author | Follow on Twitter
on July 08, 2015 at 7:27 AM, updated July 08, 2015 at 1:35 PM
In particular, I don’t think I expound enough on the tremendous joys that can be derived from the simple joys of selecting, slicing and eating a locally grown watermelon.  It occurred to me the other day that I don’t write nearly enough about the stuff that’s going on around me.

I hear you, I realize that it doesn’t take much to actually amuse me or get my attention. I’m a sucker for a seal playing a song, for instance.

But when it comes to watermelons I confess to a certain myopia when it comes to watermelons. I tend to look past them until it’s too late.

Coastal Alabama, where I hang my hat, is home to some of the finest, sweetest melons to found anywhere. Right, I hear you again say that just about every section of every state can also claim to raise the best watermelons.

Everybody claims to have the right mixture of soil – some say acidic, some say alkali – and climate – some claim rain is the key, others say drier is better. But whatever the reason, good watermelons abound in just about corner of this great nation.

The right and proper method of eating a melon is the tried-and-true method of slicing it open and eating it on the porch. It also makes wonderful salads and the juice is a marvelous base for a number of tasty (ahem) beverages.

But one aspect of the watermelon-eating experience that is often overlooked, that being the part of the melon you come in contact with first – the rind.

Somebody a long, long time ago figured out that with a little bit of finagling you could take the outer layer of the watermelon and turn it into something really special, namely watermelon rind pickles.

Watermelon rind pickles are, to me, the epitome of old-school thriftiness and frugality. I can’t say for certain who was the first person to repurpose the green hide of the melon into a topping for biscuits, toasts or just about anything else that need a sweet topping. But whoever it was was very smart and resourceful and I thank the Lord for them.

So the next time you bring home a watermelon for the family to enjoy on one of these unbearably hot July afternoons, make sure you don’t throw out the rind. You will thank me for it later.

Watermelon Rind Pickles

8 servings

Ingredients:

1 pound watermelon rind (from a 3-pound piece watermelon)

3 tablespoons plus 1 teaspoon coarse salt

1½ cups cider vinegar

1½ cups sugar

2 tablespoons pickling spice

Instructions:

Using a vegetable peeler, peel outer skin and tough green layer from watermelon rind; cut rind into 2-by- 1/2-inch strips.

In a medium saucepan, combine 5 cups water with 3 tablespoons salt; bring to a boil. Add rind. Cook at a rapid simmer over medium-high until crisp-tender, about 5 minutes. Drain, and transfer to a heatproof bowl (reserve saucepan).

In reserved saucepan, combine vinegar, sugar, pickling spice, remaining teaspoon salt, and 1 cup water. Bring to a boil, stirring to dissolve sugar and salt; pour hot liquid into bowl with rind. Use a small plate to submerge rind into liquid. Let cool to room temperature. Transfer to a container; cover and refrigerate in liquid at least 2 hours and up to 2 weeks.

SWEET JALAPENO STUFFED MUSHROOMS

Great for your grilling parties as an appetizer or to accompany your steak, chicken or fish! The glazed sweet jalapenos and crispy sweet onions are a great steak topper as well. This recipe is full of the amazing marriage of heat and sweet flavors! Great opportunity to add some new flavors to your weekend cook out! Enjoy!

Sweet Jalapeno Stuffed Mushrooms

Ingredients:

2 lb medium mushrooms or Monterey mushrooms, stems pulled and washed

2 Tblspn extra virgin olive oil

2 Cups berry jam or Smuckers Simply Fruit

1 Cup sweet pickled jalapenos

1 ea sweet onion, sliced thin

1 C flour, seasoned with 1 Tblpsn of McCormick Pepper Supreme

3 C canola oil


Preparation:

Preheat your grill to medium high

In a saute pan over medium heat, combine the fruit jam and jalapenos. Bring to a boil, and glaze the sliced jalapenos. Add a Tblspn of the pickled jalapeno juice to thin it out a bit.

Preheat the canola oil in a small pan. Dredge your sliced sweet onion in the seasoned flour. When the oil is hot, add the onions to the oil and let crisp, should only take a minute or less. Pull them out and drain on a paper towel when they are golden brown.

Toss the mushrooms in the extra virgin olive oil, place on the heated grill for 1-2 minutes a side. Until the mushrooms begin to soften. You want them grilled, softened with a bit of texture left. Remove from grill and place on your serving dish cavity side up. Spoon in a glazed sweet jalapeno slice, a bit of the fruit glaze and top with crispy sweet onions for a magnificent texture break.

Jalapeno Cheddar Pretzels

Recipe adapted from Alton Brown

Cooking time: 2 hours

Yield: 12 pretzels


Ingredients

1 1/2 cups warm water (105-110 degrees F)

1 tbsp sugar

2 tsp kosher salt

1 package active dry yeast (2 1/4 tsp)

22 oz (4 1/2 cups) all-purpose flour

2 ounces unsalted butter, melted

10 cups water

2/3 cup baking soda

1 large egg yolk whisked with 1 tbsp water for egg wash

6 packages of Texas Tito’s Sliced Jalapenos (4.2 ounces)

8 ounces mild cheddar


Directions

  1. Combine the warm water with the sugar, salt and yeast. Let stand 5 minutes or until foamy. Add the flour and butter and mix until a rough dough forms. Use the dough hook of a kitchenmixer and knead on medium speed until the dough pulls away from the sides of the bowl. The dough should be smooth and elastic.
  2. Lightly oil a large bowl. Transfer the dough to the bowl and cover. Let rise in a warm area for 50 – 55 minutes or until doubled in size.
  3. Preheat ovento 450 degrees F. Line 2 baking sheets with parchment paper and lightly brush with vegetable oil. Set aside.
  4. Combine the 10 cups of water with the baking sodain a large pot or roasting pan. Bring to a boil over high heat.
  5. Lightly oil work surface. Transfer the dough to the work surface and portion into 12 equal balls. Roll out each portion into a 24-inch rope. Shape the rope into a U-shape, hold the ends of the rope and cross them over one another, bringing them back down to the bottom of the U to form a pretzel. Repeat with the remaining portions.
  6. One by one, carefully drop the pretzel into the boiling water. Let sit in the water for 30 seconds. Remove with a large flat spatula and lay on the prepared baking sheets. Brush with the egg wash, top with the sliced jalapeno and sprinkle the cheese. Repeat with the remaining pretzels.
  7. Bake the pretzels for 12-14 minutes or until the cheese has melted and the pretzels are dark golden brown. Cool on wire rackfor 5 minutes. Serve.