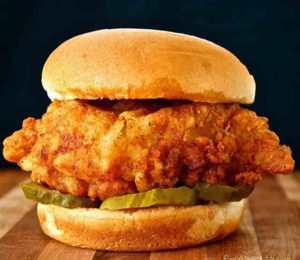
Here’s how to make a Closed-On-Sunday Chicken Sandwich

By SHARON LITTE • Times News 

“Why question the chicken crossing the road? Seems a bit judgmental.” — said me just now
Wildflour’s Cottage Kitchen
Try this recipe the next time you are craving a plain chicken sandwich with extra pickles on a Sunday.

I currently reside in this little village called Nashville. You’ve probably heard of it. Nashville is well known for quite a few things. Country music, honky-tonk bars and hot chicken are some of our shiny attributes and never fail to impress locals and tourists alike.

Hot chicken is and always has been a big deal here. I could go into the history, but my short attention span and the conflicting stories lead me to one conclusion concerning its origin. A really good cook got really mad at her significant other and loaded his chicken dinner with enough cayenne pepper to make him think twice about doing that again. Whatever THAT was. Short story — he loved it! Maybe that revenge should have been served cold.

I have enjoyed all of the local establishments that feature hot chicken, but occasionally I just want a plain chicken sandwich with extra pickles and some waffle fries. Unfortunately, this craving usually happens on Sunday. It’s a sad, sad story.

The recipe that I’m sharing comes very close to replicating this particular sandwich, and I hope you enjoy it on any given weekday. Eat more chikin. Cheers!

Ingredients:

4 chicken breasts (boneless and skinless)

1 16-ounce jar dill pickle chips

2 cups water

5 1-ounce packets Hidden Valley Ranch salad dressing mix

1/4 cup sugar

2 T. powdered sugar

3 T. salt

1 cup all-purpose flour

2 tsp. black pepper

4 T. butter

2 T. honey

4 sandwich buns

Dukes mayonnaise

Peanut oil for frying

For the brine:

Strain the pickles over a large bowl and set pickles aside. Add water to the pickle juice and whisk in four packets of the dressing mix, sugar and 1 T. of the salt. Pour this brine into a large zip-top bag and add chicken. Refrigerate up to three hours.

Heat oil in deep fryer to 330 degrees F. Line a baking sheet with paper towels and top with a cooling rack.

In a medium bowl, whisk flour, powdered sugar, remaining seasoning packet, salt and pepper.

Pull chicken from the brine and coat in flour mixture. Let sit on rack for about five minutes then dredge in flour again.

Deep fry breasts about eight to 10 minutes until no pink remains. Transfer chicken to a clean rack to cool.

For the buns:

Heat butter and honey in a small saucepan until combined then transfer mixture to a large skillet. Over low heat, toast the split buns in the honey butter.

Spread the bottom with mayonnaise, top with chicken breast, dill pickles and close the sandwich with the top bun.

Sharon Little is a community contributor for the Kingsport Times-News.

Don’t get in a pickle with preserving, says chef Jamie Scott

by Jamie Scott   –   The Courier

Meat and Pickle Board

At the restaurant fermentation and preserving are just as important to us as local sourcing and seasonal cooking, says Jamie Scott, chef patron of The Newport.

That’s  because, in my opinion, it enhances certain foods by manipulating and prolonging its existence.

A combination of both preservation and fermentation – and probably the most in demand just now – is sourdough (levain) bread, perfect topped with anything from cultured butter to a little bit of pate to be spread over and devoured in one bite.

My interest in these methods was first aroused by my parents’ love for pickled onions. They would always go for the large onions in the tastiest malt vinegar that would make a camel’s eyes water after one bite, even in the middle of the Sahara.

“Now those are pickles,” Dad would say, and they were fine. But when I finally tasted a real pickle, the kind made the old-fashioned way, fermented with nothing more than salt, water and thyme, I realised what I’d been missing. A vinegary pickle ploughs through your palate (often in a pleasing way) but a live cultured, salt cured, fermented pickle tells a more multifaceted story.

It’s sour, to be sure, but it tastes of something more something elusive – it’s the flavour of middle Europe captured in one bite.

When I started cooking for a living, I realized that the complexity I’d tasted in that pickle is the hallmark of well-made fermented food, which include some of my very favourite things to eat and drink – pickles, aged cheeses, tangy sourdough, spicy kimchis, tart yogurts, winey salamis and of course wine itself.

I’m not short of volunteers in the kitchen to start fermentation projects we are all love trying out a new sauerkraut recipe or getting stuck into a fresh batch of new season carrots from the local farm along the road. Making our own yoghurts and skyr seemed like kitchen magic the way it so effortlessly soured and thickened overnight.

Nurturing live cultured foods, watching their colours change and tasting the results is so incredibly satisfying and I would urge anyone to give it a go.

Chef’s tip

Try my super easy and delicious pickle recipe which will kick start your love for pickling and preserving. Put 200ml white wine vinegar, 200ml water, 100g caster sugar, 1 tsp pink peppercorns, 1 bay leaf and 2 sprigs of thyme in a pan and bring to the boil, cool to room temperature ready to use.

Take any of your desired vegetable, peel or give them a really good wash, pop into a kilner jar and cover with the pickle liquor. Pop a wee bit of greaseproof paper as a small weight to keep everything fully submerged. Leave for as long as desired, but initially a minimum of two to three weeks.


Bacon Pickle Fries Are Your New Dream Snack

By Kate Streit   –   Magicvalley.com

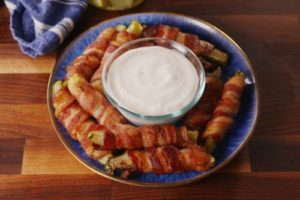
Bacon Pickle Fries

There is no question that pickles are having a moment. There is an entire restaurant dedicated to pickles in New York City, and recipes featuring pickles are popping up everywhere, from pickle mozzarella sticks to pickle cupcakes. The pickle craze certainly shows no signs of stopping! Now, pickles are combining with another superstar ingredient to be your next dream snack: bacon pickle fries.

Bacon makes everything better, and it turns out that pickles are no exception. In fact, this may be the best pickle culinary creation yet. A super-simple recipe from Delish.com features just two ingredients: pickles and bacon. What else do you need in life, really? Check out the how-to video on Facebook:

Be sure to wrap the bacon super-tight so the fries don’t unravel. Turning them once or twice in the oven will also ensure maximum crispiness, which is key.

As one commenter pointed out on the Facebook post, bacon pickle fries are actually low-carb if your New Year’s resolution is to lay off the starchy stuff.  Easy, delicious and low-carb? (Okay, to be fair, there’s probably a ton of fat in these because BACON, but at least they’re low-carb.)

The recipe suggests dipping these fries in ranch dressing, which sounds like the perfect accompaniment. Since the recipe is so easy, why not go all in and whip up your own homemade ranch dressing? This Delish.com recipe for avocado ranch dressing sounds particularly impressive, yet easy enough to make.

If you really want to get fancy, you could even make your own pickles. This recipe from The Kitchn said it’s possible to whip up a few jars of homemade dill pickles in less than 30 minutes. Make sure you pick the right cucumbers — Kirby or Persian varieties are recommended.

Yum! Looks like you have you contribution to the Superbowl party sorted!

[H/t Delish]

This story originally appeared on Simplemost. Checkout Simplemost for other great tips and ideas to make the most out of life.

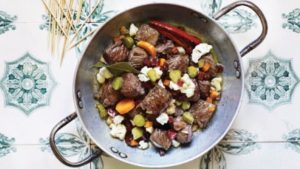
Recipe of the week: Pica pau (quick-fried beef with pickles)

WRITTEN BY: NEWS DESK  –   The Caterer

Photography 
by Andrew Montgomery

Pica pau means ‘woodpecker’, and you eat this dish with a cocktail stick, picking pieces up and gobbling them a bit like its namesake would. My version uses beef fillet; if you ask your butcher to give you the tail ends of the fillet it will be a lot cheaper, without compromising on flavour. I use Ibérico ham for its rich, sweet flavour. You could use other cured hams, but remember to check the salt 
content, since some types are saltier and less nutty than Ibérico. When I dream of this dish, which I often do, it always comes with an ice-cold draught beer.

Serves 4

For the pickled vegetables
600ml Japanese rice vinegar
600g caster sugar
50g fine sea salt
2 bay leaves
½tsp black peppercorns
1 small head cauliflower, 
cut into bite-sized florets
2 carrots, cut into 5mm slices
1 onion, cut into eighths

For the piri piri oil
5-7 fresh piri piri, malagueta 
or bird’s eye chillies
4 garlic cloves, finely chopped
1tsp fine sea salt
300ml olive oil
10 dried piri piri or 
malagueta chillies
2tbs brandy or aguardente velha
Finely grated zest of 1 lemon
1tbs lemon juice
1tbs white wine vinegar
3 bay leaves
A few black peppercorns

For the pica pau
1tbs good-quality pork fat
1tbs olive oil
1 garlic clove, smashed
1 small long red chilli, deseeded (optional) and halved lengthways
300g beef fillet, rump or sirloin, 
cut into bite-sized pieces
150g thick-cut cured ham, ideally Ibérico, Serrano or Parma ham, finely chopped
10 small gherkins, finely chopped
About 1tbs dry white wine, to taste
A small handful of parsley leaves, finely chopped
Lemon wedges, to serve
Piri piri oil, to serve (see above)
Sea salt flakes and ground 
white pepper

To make the pickled vegetables, put the rice vinegar, sugar, salt, bay leaves and peppercorns in
a pan with 600ml water. Place 
over a medium heat and cook until the sugar has dissolved. Increase the heat and bring it to the boil, then add the cauliflower, carrots and onion.

Remove from the heat and transfer to a bowl to cool, along with the liquor. I like to make this the day before I use it. Stored in an airtight container, it should keep for two weeks in the fridge.

To make the piri piri oil, make a paste with the fresh chillies and sea salt using a pestle and mortar or a food processor. Heat the paste with 60ml of the oil in a small 
pan over a low heat. Add the remaining ingredients, except the remaining oil. Increase the heat to medium and cook for 3-4 minutes, to burn off the alcohol and lightly caramelise the garlic and chillies. Remove the pan from the heat and stir in the rest of the oil.

To make the pica pau, take a handful of the pickles, cut them into small pieces and then set aside.

Melt the pork fat and olive oil over a high heat in a large frying pan. When the fat starts to sizzle, add the garlic, chilli and beef and season with salt and pepper. Fry quickly for 2-3 minutes.

Stir in the ham, chopped pickles and gherkins, then add the white wine, starting with half a tablespoon and adding more to taste as required, along with a splash of pickle liquor if you like. Fry for another minute. Take the pan off the heat and stir through the parsley. Serve immediately, 
in the pan, with cocktail sticks. Lemon wedges and a drizzle of piri piri oil are nice additions.

Recipe taken from Lisboeta: Recipes from Portugal’s 
City of Light

Photography 
by Andrew Montgomery

Jalapeño Popper Dip is Your Favorite New Make-Ahead Appetizer

BY: BESSIE MCDONALD-GUSSACK   –   Food Network Canada

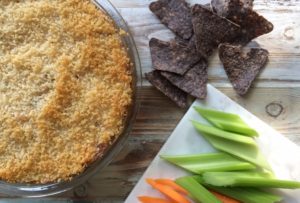
Everything you love in a jalapeño popper is whirred into a cheesy, party-perfect dip. Spicy jalapeños, crispy bacon, cream cheese and a crunchy topping come together for a delicious, ultra-indulgent dip. Serve this up with veggies and tortilla chips at your next party for a crowd-pleasing riff on the new-classic appetizer.

Jalapeno Popper Dip

Prep Time: 5 minutes
Cook Time: 50 minutes
Total Time: 55 minutes
Serves: 8 to 10

Ingredients: 
6 strips bacon
2 (250 g) pkgs cream cheese, softened
1 cup mayonnaise
1 cup shredded Cheddar cheese
4 jalapeños, seeded and finely diced
3 green onions, minced
1/2 cup panko breadcrumbs
Sliced veggies or tortilla chips for serving

Directions:
1. Preheat oven to 350ºF.

2. In a large skillet over medium heat, cook bacon, turning occasionally, until crispy, about 10 min. Remove bacon to a paper-towel lined plate and reserve 2 Tbsp bacon grease in a medium heat-safe bowl. Once bacon is cool, chop or crumble into pieces.
3. In a large bowl, mix cream cheese until smooth. Gradually mix in mayonnaise until fully combined. To cream cheese and mayonnaise, add Cheddar, jalapenos, green onions and bacon pieces and mix to combine. Spread cream cheese mixture evenly into a 9-inch round ovenproof dish.

4. Stir panko into reserved bacon grease and sprinkle over cream cheese mixture. Bake for 35 to 40 minutes, until bubbling at the sides. Serve warm with tortilla chips or veggies for dipping.

Make-Ahead: You can make this dip ahead of time (without the panko topping, and prior to baking) and store covered in the refrigerator for up to 2 days. Warm refrigerated bacon renderings in the microwave until liquefied and stir in panko. Sprinkle cream cheese mixture with panko mixture and bake, adding 5 minutes to the cooking time (40 to 45 minutes instead of 35 to 40 minutes).

Nothing gets a crowd going like a good dip, so here are over 25 party-perfect options to dive into.

Bessie McDonald-Gussack

Bessie McDonald-Gussack is a Toronto based recipe developer and writer who absolutely lives for food and has always been interested in cooking, baking, food trends, restaurants and of course, eating. After having worked in the baking industry, Kraft Foods and interning in the test kitchens of Chatelaine and Canadian Living magazines, Bessie decided to go solo, working as a freelance recipe developer and culinary consultant. She’s created hundreds of recipes from the savory to the sweet and all delicious combos in-between.

You Don’t Need Fancy Tools To Clean Peppers

By Sam Bithoney   –   Skillet

Photos by Sam Bithoney

Peppers, of any variety, are a pain in the ass. Irregularly shaped, filled with bitter ribs and somewhere between 12 and 850,000 tiny seeds that make their way into the darker recesses of your kitchen, hoping to be found one day by anthropologists who proclaim “They were just like us!”

Mankind has come up with some interesting solutions for this problem, but it doesn’t apply universally—most of these tools are focused on Bell and Jalapeño varieties. There’s an easier way, and all you need is a thin, sharp knife.

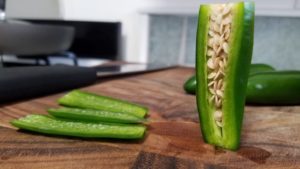
Start by cutting off the top and bottom of the pepper, which will provide you a level surface on your cutting board. After that, peer into the pepper. You’ll be able to see the entire structure with ease, and from there just follow the inner walls with your knife, cutting opposing sides each time to maintain stability.

You’ll have uniform slices, perfect for cutting into matchsticks and dicing without those weird curly ends, as well as a rectangular prism filled with seeds that fits perfectly in the trash.


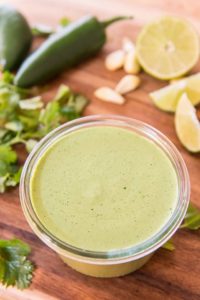
Jalapeño Cilantro Sauce

By Joanne — fifteen Spatulas

This is one of my “I want to put it on everything” sauces and it’s based off a wildly popular green sauce recipe from a Peruvian restaurant in NYC. It only takes 5-10 minutes to make, and is perfect with so many dishes!

Jalapeno Cilantro Sauce

Last week on my Instagram stories I shared a video of me making this sauce, and I put up a poll asking if people were interested in more simple sauce recipes on the blog.

The answer was a resounding YES!

As in, 97% said yes please. So here’s one of my favorites.

This Jalapeño Cilantro sauce is a riff on a green sauce that’s served at a chain of restaurants in NYC called Pio Pio.

The sauce has a bit of a cult following because it’s outrageously delicious, and many have tried to figure out their secret recipe to no avail.

Including me, ha.

When I was living in NYC I would order takeout of their sauce and try to figure it out. I also scoured the internet for clues and found this post from Serious Eats where they try to figure the sauce out as well.

They claimed that one of the secrets was a hot yellow chile paste from Peru, so I even ordered that from Amazon to try to nail the sauce.

But their copycat recipe wasn’t the same as Pio Pio, and not close. Shucks.

These days, I’ve settled down my sauce replicating ambitions and have accepted this sauce for the deliciousness that it is.

Because ordering a $10 jar of special Peruvian chile paste isn’t necessary here, and more isn’t always better.

This sauce is creamy, bright, and flavorful, and if you try it I really think you’ll LOVE it!

I find myself making it regularly and so far I haven’t tired of it, even after making it for the past couple years.

To make the sauce, place chopped jalapeños, cilantro, garlic, lime juice, mayonnaise, oil, salt, and pepper in a blender:

I like the sauce on the milder side, so I seeded and ribbed the jalapeños before chopping, but you can leave the seeds and ribs in if you prefer it spicy.

Blend it all up until the sauce is smooth and creamy:

Give it a taste and adjust the seasoning if necessary. Sometimes I prefer a little more lime.

I find the sauce tastes slightly better after it chills for a few hours, so it’s great to make ahead!

I actually keep a container of this stuff ready to go in the fridge, and it keeps for a good week.

This sauce is great drizzled on Crispy Smashed Potatoes, spooned onto Spice Rubbed Chicken, drizzled on veggies, and I even use it as a salad dressing sometimes. Enjoy!

Jalapeno Cilantro Sauce

This sauce is based off the Pio Pio green sauce recipe and is one of my “I want to put it on everything sauces.” It only takes 5-10 minutes to make.

Ingredients

  •  jalapeños
  •  bunch fresh cilantro (2oz)
  •  medium cloves garlic (1.5 tbsp)
  •  1/2 cup mayonnaise
  •  tbsp fresh lime juice
  •  tbsp avocado oil
  •  1/2 tsp sea salt
  •  1/4 tsp freshly ground black pepper

Instructions

  1. For a milder sauce, remove the seeds and ribs from the jalapeños, then roughly chop them. For a spicier sauce, leave the seeds and ribs in, and simply chop the jalapeños. You should have about 1 cup of chopped jalapeños.
  2. Place the jalapeños into a blender along with all the remaining ingredients (I even include the cilantro stems), and blend on high for at least 30 seconds, until the sauce is smooth and creamy.
  3. Store in the refrigerator for up to 1 week. Enjoy!

by Joanne Ozug

Nutrition Information Serves 6, makes a little over 1 cup of sauce     ADJUST SERVINGS
Amount per serving: Calories 183kcal Calories from fat 176 Total Fat 20g Saturated Fat 3gCholesterol 8mg Sodium 116mg Carbohydrate 2g Dietary Fiber 1g Sugars 0g Protein 0g

Venison Empanadas

These appetizers will be a hit at holiday parties

By JERRY DILSAVER   –   Carolina Sportsman

After their surfaces are brushed with egg wash, Empanadas should bake until golden brown.

As we approach the holidays, family gatherings, holiday dinners and all sorts of things involving food will arise, to which many sportsmen will generously share their fish and game. I enjoy this, but I suggest that you label any game or fish dish taken as such.

A surprising number of people still don’t care for game and fish. They generally don’t like the surprise of being told a dish they are complimenting is game or fish. Surprisingly, these realizations often bring on even more-stringent denials of the fine flavor and healthy aspects of wild fish and game. By labeling dishes, folks who appreciate your sharing can enjoy them, while others will be forewarned — and there might be leftovers to take home for snacks.

The first real brush with winter weather typically arrives in the Carolinas this month. Those cold days feel good in a duck blind or deer stand, listening to a pack of trailing dogs hot on the scent or following a pair of pointing dogs through the broom straw and brambles.

This recipe features venison sausage, but it could be made with regular ground venison or feral pig sausage. It can be made with domestic burger or sausage, too, if you get in a pinch or are told no game is allowed at a gathering you’ll be attending. It’s not as good, but it’s still better than most.

This is a good recipe to take to parties. I promise it won’t be like the five varieties of homemade pimiento cheese or multi-bean salads. This dish should be fairly unique. Once the word gets out it’s venison, your fellow sportsmen usually ensure that all you have to take home is an empty platter. You’ll probably get asked to make more for football bowl game parties later in the month, and that’s not a bad thing. You’ll get to enjoy them again.

Try Venison empanada appetizers

I like food with a little spice, and around Christmas, I try to present something that is tasty, yet unique, for parties around the holiday and college football bowl games to which many sportsmen receive invitations.

Empanadas are basically meat pies, and these are downsized to appetizer or finger food-size. They are tasty, and the biggest problem with them is overeating. I try to eat the leanest meats possible, and when it comes to sausage, that is game sausage.  These may be made with venison burger or sausage, feral pork or domestic burger or sausage. If you use feral or domestic pork, be sure to cook the meat fully.

My venison burger and sausage is mixed at 20-percent fat, so it cooks lean, with very little grease. In fact, I have to lightly spray non-stick cooking spray in the pan to keep it from sticking. If you use a higher percentage of fat in your venison or prepare this with domestic meat, take care to drain the fat as fully as possible so the bottom of the empanadas aren’t weak.

If you use domestic or venison burger, I would suggest considering using taco seasoning instead of fajita seasoning for more flavor. I try to reduce salt intake; numerous low-salt recipes for taco and fajita seasonings are available online. I haven’t found a commercial, low-salt fajita seasoning, but low-salt taco seasoning is available at many grocery stores.

Folks with milder palates might also consider substituting bell pepper for the jalapeno. I feel a single jalapeno is very mild, but some folks have suggested it adds too much heat. Others add a second or third jalapeno for a little kick. If you substitute bell peppers, the baby bells in assorted colors are usually milder and more tender than full-size bell peppers.

I cheat a little with these and use prepared biscuits rather than making dough. The concept of this column is easy cooking, and this makes it real easy. I would still suggest getting out the rolling pin and rolling the dough flat and thin. Otherwise, it rises too much and tries to open the empanadas. If you use Texas-sized biscuits, half of one will make a 3- to 4-bite empanada. However, it’s much easier to get the crust edge sealed with larger pieces of dough. The biscuits come in 10 packs, and this filling mixture will make three to four packages, depending on how full you stuff the empanadas.

Most folks like a dipping sauce with empanadas. I like them straight from the pan, too, but there are many simple options for adding dipping sauces. The simplest dipping sauces are sriracha and chipotle ranch salad dressings. Just pour some in a bowl and go. Mixing some Texas Pete Cha Sauce with a little mayonnaise makes a good sauce. Honey mustard, hot mustard and others are available to suit all tastes. If you have a favorite, give it a try.


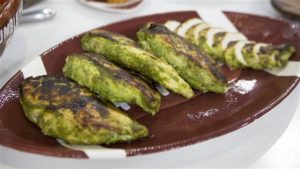
Spicy Jalapeño Chicken

By Tre Wilcox   –   Today

Nathan Congleton / TODAY

SERVINGS:

4

Spicy jalapeños, herbaceous cilantro and zesty lime juice turn plain chicken into a flavorful sensation.

Ingredients

    • 4 boneless, skinless chicken breasts
    • 3/4 cup olive oil
    • 3 jalapeño chiles
    • 12 cloves garlic
    • 3 shallots, peeled
    • 1 bunch cilantro, washed
    • 2 tablespoons cumin seeds
    • 2 teaspoons lime juice
    • 2 teaspoons cracked black peppercorns
    • Kosher salt
    • Grape seed oil


Preparation

Place the chicken breasts into a zip-top freezer bag. Place the olive oil, chiles, garlic, shallots, cilantro, cumin seeds, lime juice and black peppercorns into a blender. Blend on high till smooth. Pour marinade over the chicken. Seal and refrigerate overnight or at least four hours.

Preheat oven to 350°F. Remove chicken from marinade, season with salt.

Heat a large sauté pan over medium-high heat and add a drizzle of grape seed oil. Sear the chicken breasts on both sides, then place into oven and cook until cooked through and the internal temperature reaches 165°F, about 10-15 minutes.

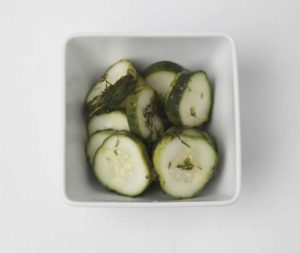
Recipe: Easy Fridge Dill Pickles

Reprinted from the San Antonio Express News

Photo: Juanito M. Garza /San Antonio Express-News

Dill pickles can be ready in less than a day with a simple recipe that involves pickling cucumbers, dill and white vinegar.

Makes 12 servings

8-10 smaller, firm pickling cucumbers

3 teaspoons kosher or pickling salt

2 tablespoons chopped dill

¾ cup white vinegar

Instructions: Slice cucumbers approximately ¼-inch thick and set aside.

Add salt, dill and vinegar to a 1-liter or equivalent lidded jar. Give it a good shake to mix ingredients. Add cucumber slices to fill jar just enough to still be able to close the lid.

The liquid level in the jar will look extremely low compared to the pickle pile, but don’t worry about it. The salt will draw the moisture from the cucumbers and wilt them, while the liquid becomes a perfectly balanced pickle brine and will rise.

Give the jar another good shake, and place near the front of the refrigerator to remind you to shake the jar every time you open the fridge. Pickles will become ideal after 8 hours. They will keep in the fridge, submerged in their brine, for as long as three weeks.

Per serving: 47 calories, 0 g fat (0 g saturated fat), 0 mg cholesterol, 7 mg sodium, 11 g carbohydrates, 2 g dietary fiber, 5 g sugar, 2 g protein