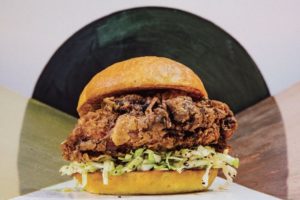
Pickle-Brined Fried Chicken
Check the pickleback at the door and use that brine for a new take on the classic sandwich
Photo: Eric Wolfinger © 2018
Chris Kronner knows burgers. In fact, he’s made a name for himself off of them. And in his new cookbook, A Burger to Believe In, Kronner shares tips, tricks and recipes for making the perfect burger. Now, the classic is always reliable, but his burger knowledge goes beyond beef—like for these chicken thighs that are marinated in pickle juice and buttermilk, then fried until golden and topped with a black pepper slaw. The recipe takes a bit of forethought; you’ll want to make sure you have enough time to marinate for maximum tenderness. But the effort is mainly hands-off and the results more than worth it.
Pickle-Brined Fried Chicken
Reprinted with permission from ‘A Burger to Believe In: Recipes and Fundamentals,’ by Chris Kronner with Paolo Lucchesi, copyright © 2018. Published by Ten Speed Press, an imprint of Penguin Random House.
Yield: 4 servings
Prep Time: 10 minutes, plus overnight brining
Cook Time: 10 minutes
Total Time: 20 minutes
Ingredients
For the Chicken:
4 boneless chicken thighs (skin-on or skinless)
3 cups dill pickle juice
3 cups buttermilk
For the Slaw:
½ head green cabbage, cored and sliced
1 tablespoon sherry vinegar
1 teaspoon honey
1 teaspoon kosher salt
1 teaspoon Urfa, Marash or Aleppo chile flakes
½ teaspoon freshly ground black pepper
For the Sandwiches:
2 cups all-purpose flour
2 tablespoons cornstarch
1 tablespoon freshly ground black pepper
Kosher salt
8 cups rice bran oil, for frying
4 pain de mie buns
2 tablespoons unsalted butter, at room temperature
Directions
1. In a large bowl or jar, fully submerge the chicken thighs in dill pickle juice. Cover and refrigerate for at least 6 hours, or up to 24 hours.
2. Remove the chicken thighs from the pickle juice, and then fully submerge them in the buttermilk in a second large bowl or jar. Cover and refrigerate. Let the chicken soak for at least 1 hour, or up to 12 hours.
3. Make the slaw: On the day you fry the chicken, put the cabbage in a large bowl. Add the vinegar, honey, salt, chile flakes, and pepper and toss until combined. Let sit while you fry the chicken.
4. When ready to fry the chicken, stir together the flour, cornstarch, pepper, and 1 teaspoon salt in a large bowl. Remove the chicken from the buttermilk, then dredge the chicken in the flour mixture, turning it to completely coat.
5. In a Dutch oven or heavy pot, heat the oil to 345°F over high heat. (If you’re a beginning fryer, it’s probably best to fry one thigh at a time; once you get the hang of it, you can try doing more at once.) Fry the chicken until it’s golden brown or it reaches an internal temperature of 165°F, about 6 to 8 minutes. Adjust the heat as needed to maintain the temperature at 325°F. Using a spider skimmer or other small strainer, remove the chicken from the oil and drain on paper towels. Sprinkle with salt as desired.
6. While the chicken rests, toast the buns. Heat a cast-iron skillet or similar surface over high heat. Slice the buns in half horizontally. Smear the butter on the buns and place, butter side down, on the hot surface, working in batches if necessary. Toast until golden brown, 2 to 3 minutes.
7. Place a large handful of the coleslaw on a bottom bun and top with a chicken thigh. Be sure not to put a mountain of slaw on the sandwich; you want just enough to add some crunch and acid to the fried chicken. Cap it off. Repeat with your other sandwiches. Eat immediately.


